16 Kitchen Pendant Lighting Ideas with Form and Function in Mind
Pendant lighting is where a kitchen’s looks and its everyday usefulness meet. A well-chosen pendant washes the island in warm,…
Pendant lighting is where a kitchen’s looks and its everyday usefulness meet. A well-chosen pendant washes the island in warm, usable light, keeps the room feeling welcoming after dark, and gives the eye something pleasing to land on. The trouble is that most of us shop for pendants the way we shop for artwork: we fall for the shape and forget the job. This guide takes the other route. Each of the sixteen ideas below pairs a real fixture style with its practical purpose, where it hangs and what to measure before you buy, so the fixture you love is also the fixture that works. Start with the rules, then pick the idea that fits your room.
In This Guide
- A Subtle Contrast Against The Wall
- A Vintage-Inspired Silhouette
- A Contemporary Cylindrical Form
- An Adjustable Head For Practical Use
- A Dimmable Option Where Compatible
- A Rounded Shape Softening Straight Lines
- A Ceramic Or Wood Accent On The Base
- A Restrained Dark Fixture In A Light Room
- A Light Finish In A Dark Corner
- A Compact Design Leaving Useful Surface Space
- A Layered Arrangement At Different Heights
- A Warm Shaded Light Beside The Focal Area
- A Sculptural But Proportionate Fixture
- A Simple Metal Finish Repeated Nearby
- A Diffused Globe-Style Form
- A Narrow Fixture In A Tight Space
Kitchen Pendant Lighting Rules Before You Start
A pendant that hangs at the wrong height turns a beautiful fixture into a daily annoyance. Before you fall for any of the sixteen ideas below, lock in these basics and every choice gets easier.
Hang pendants over an island so the bottom of the shade sits 30 to 36 inches above the countertop. That keeps sightlines open across the room while the light still lands where you chop and stir. Over a dining table in an open kitchen, aim for roughly the same range measured from the tabletop, and make sure the lowest point clears 6 feet from the floor if anyone walks beneath it. For multiples in a row, spacing of 24 to 30 inches between shades is a common rule of thumb, which works out to about one pendant per 2 feet of island. A 6-foot island carries three comfortably; an 8-footer can take three with breathing room.
Think in layers, because pendants alone rarely light a whole kitchen. Pair them with recessed or under-cabinet lighting so the counters have task light even when the pendants glow low. Choose bulbs in the 2700K to 3000K range for warm, appetizing light, and check the bulb’s lumen rating against the job: an island prep zone wants noticeably more output than a decorative corner nook.
Wiring is the part people underestimate. Swapping a pendant for an existing one is usually straightforward, but new wiring, new junction boxes, or moving a fixture’s location is work for a licensed electrician and must follow your local electrical requirements. Dimmers need compatible bulbs and dimmer switches, so check both sides before you buy. If the pendant hangs near a sink, confirm the fixture is rated for damp locations.
Finally, mock it up. Tape a paper circle the size of the shade to a string and hang it at your planned height for a day. You will see immediately whether it blocks a view, crowds a cabinet door, or sits exactly where you want it. That small dress rehearsal saves more regret than any showroom visit. If you are also rethinking storage nearby, a tidy pantry makes the whole kitchen feel calmer; our small pantry organization guide pairs well with a lighting refresh.
1. A Subtle Contrast Against The Wall
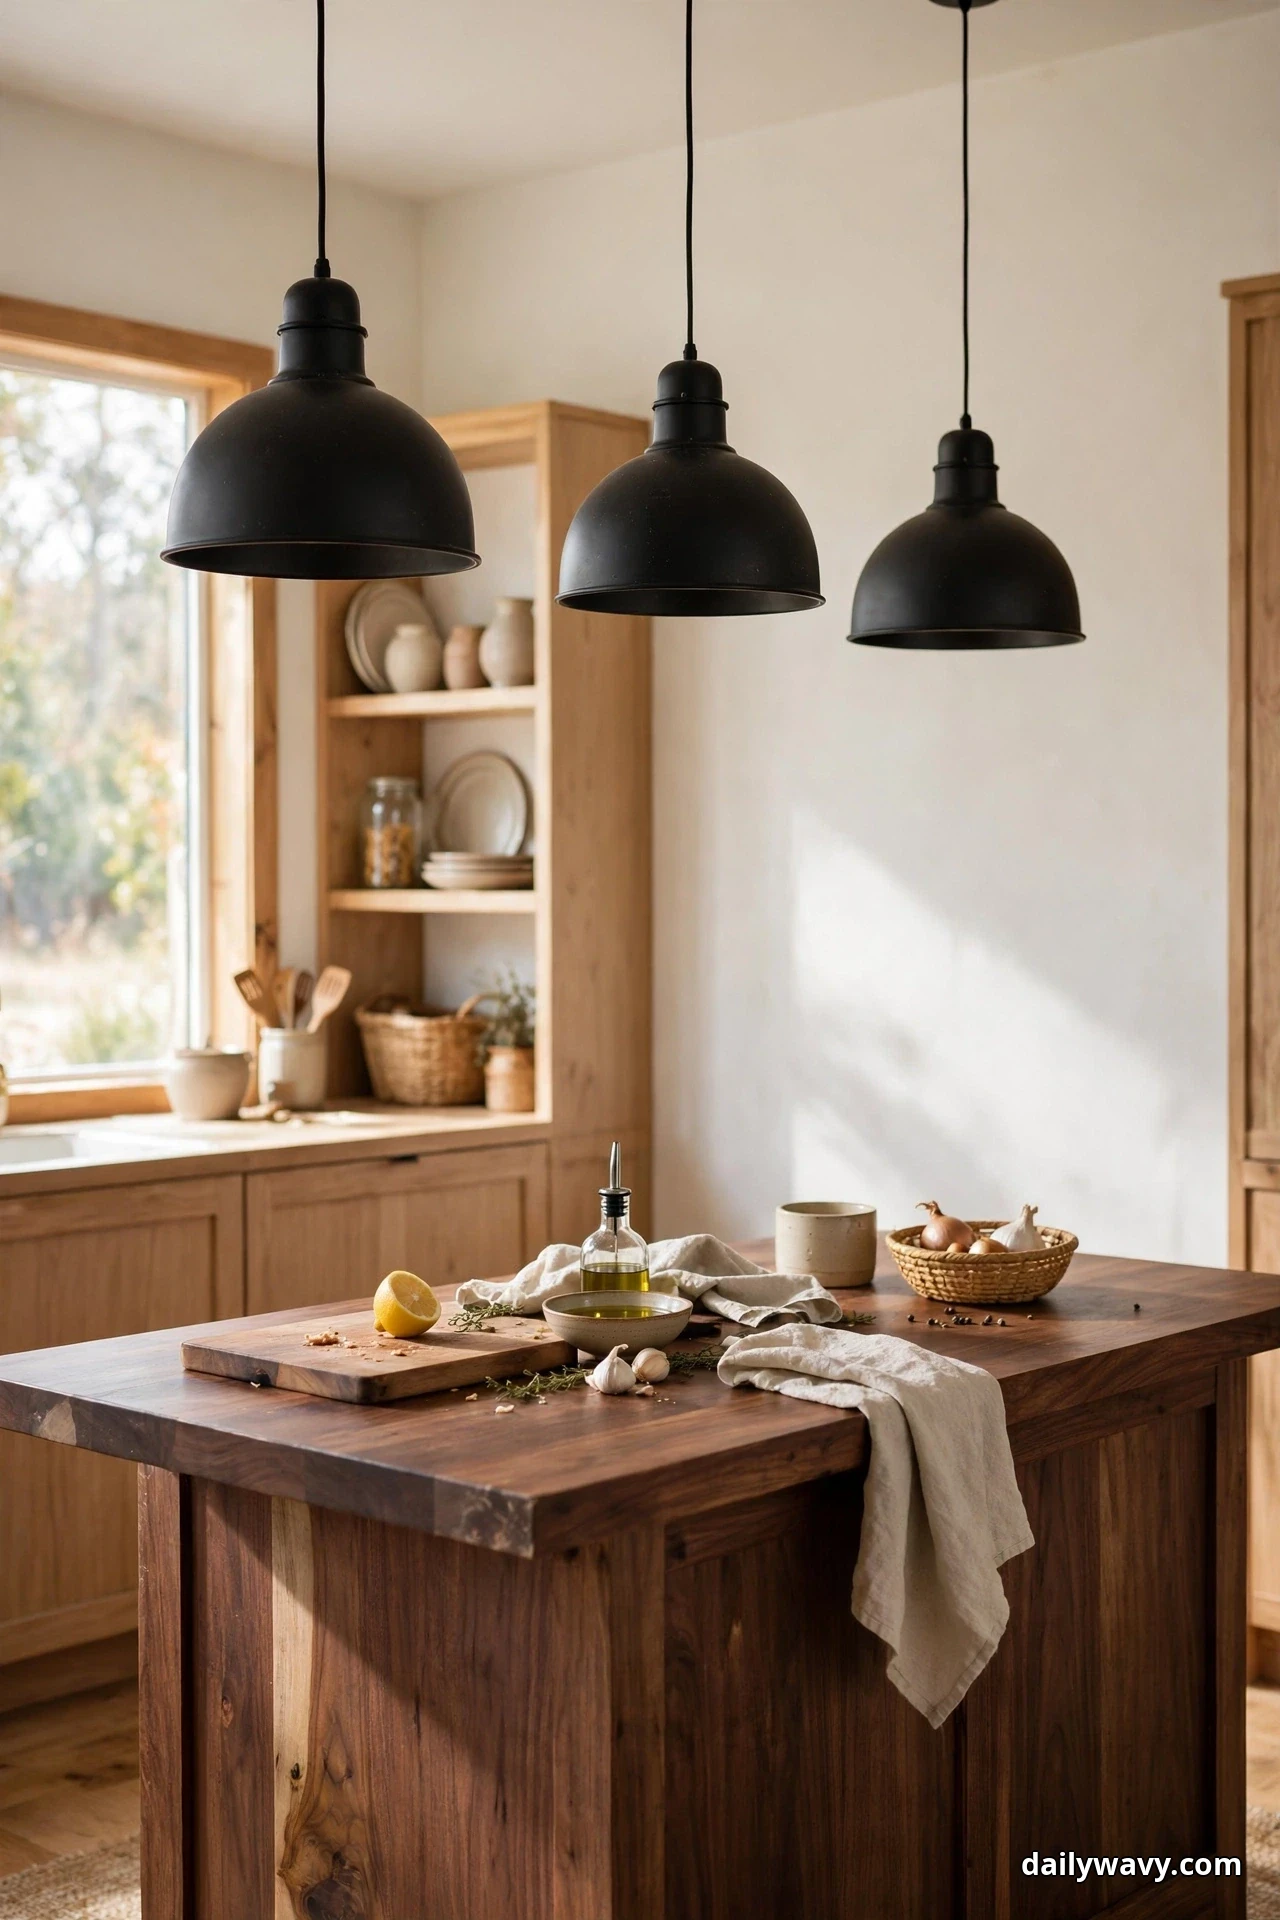
There is a quiet confidence in a dark pendant against a light wall. Two matte black domes over a walnut island read as deliberate, like a signature at the bottom of a well-written letter. The contrast gives the eye a clear focal point without adding visual clutter, and it works in almost any style, from farmhouse to contemporary, because contrast itself never goes out of fashion. The light falls in a warm pool on the counter, and the dark shades disappear into the background during the day while framing the evening’s glow after dark.
What to measure: Note your wall color’s depth first. On a bright white wall, a black or deep bronze shade gives the crispest contrast. Measure the island length and divide by the number of pendants you want; 24 to 30 inches center to center keeps the rhythm even. Check the drop: bottom of the shade 30 to 36 inches above the countertop.
Materials and placement: A powder-coated metal dome in matte black or dark bronze is the classic pick. Hang two over a 5-foot island, three over a 6-foot island or anything longer. Keep the rest of the palette calm: warm white walls, wood tones, one dark accent repeated once more (a frame, a stool base) so the pendants feel related rather than random.
Effort: Low to moderate. If a fixture is already wired over the island, swapping the pendant is an afternoon job. New positions need an electrician.
Lower-cost alternative: Spray-paint an existing light-colored dome pendant with matte black heat-rated spray paint. Clean, prime, and follow the paint’s cure time for a finish that holds up to bulb heat.
A practical tip: Dark shades direct light downward, which is wonderful for task lighting but leaves the ceiling darker. If your kitchen already feels shadowy above, add a small upward-facing light, like under-cabinet lighting aimed at the backsplash, to keep the room balanced.
2. A Vintage-Inspired Silhouette
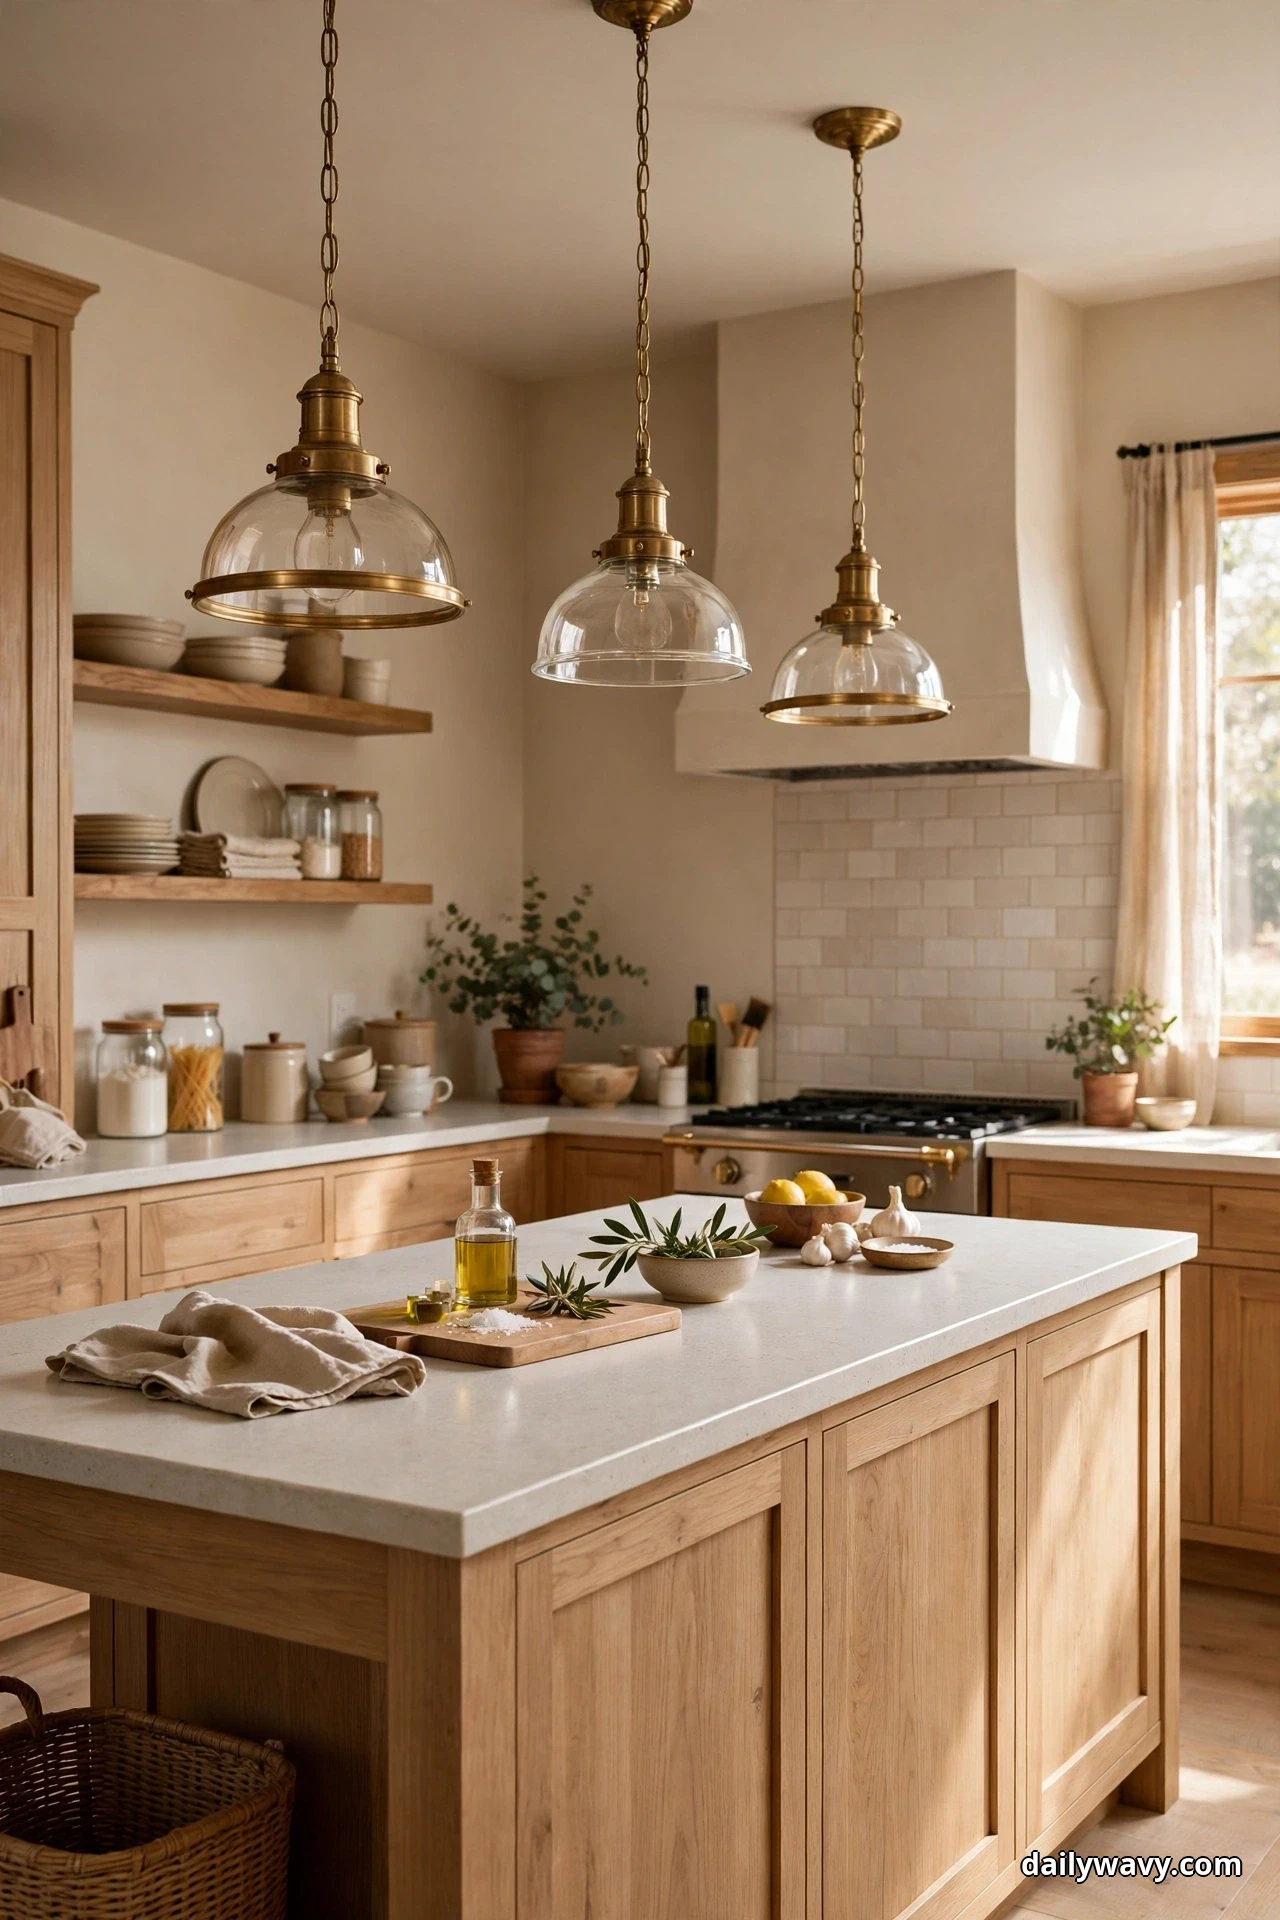
Vintage-style pendants bring the charm of an old schoolhouse or a French bistro into a room that works hard every day. A brass schoolhouse shade or a seeded-glass globe has a silhouette that feels collected rather than decorated, and it softens the hard edges of appliances and cabinetry. The appeal is emotional: these shapes remind us of kitchens that were loved for decades, and they make a new kitchen feel settled. The trick is keeping the rest of the room current so the pendant reads as character, not costume.
What to measure: Vintage-style shades are often wider than modern ones, so measure the shade diameter and make sure adjacent pendants will not crowd each other. For a schoolhouse globe of 12 inches, three over a 7-foot island leaves comfortable breathing room. Check clearance from upper cabinets and the range hood sightline.
Materials and placement: Brass, aged bronze, or nickel with glass in milk, seeded, or clear finishes. Hang in a straight row over the island, or try one oversized vintage shade over a small breakfast table where it becomes the room’s centerpiece. Pair with simple hardware in a matching metal so the fixture feels intentional.
Effort: Low. These are widely available in standard sizes and wiring, so replacement is usually simple.
Lower-cost alternative: Hunt secondhand for genuine vintage glass shades and have them professionally rewired. A professional rewire with a new cord set costs far less than a designer fixture and gives you a one-of-a-kind piece.
A practical tip: Clear glass vintage shades show the bulb, so choose a good-looking LED filament bulb and keep a few spares. Frosted or seeded glass hides the bulb and softens glare if you prefer not to think about it.
3. A Contemporary Cylindrical Form

When the kitchen itself is sleek, the pendant should speak the same language. A slim cylinder in white, black, or brushed metal adds vertical rhythm without visual noise, and because the form is so restrained, you can hang a longer row of them for drama that still feels calm. Cylinders are especially kind to small kitchens: their narrow profile reads light and airy, and the focused downward beam is genuinely useful over a prep surface. They photograph beautifully too, which matters if you love sharing your kitchen.
What to measure: Cylinders are narrow, usually 4 to 6 inches in diameter, so you can space them 24 inches apart over a long island without crowding. Measure the total length of the run to confirm the row stays inside the island’s footprint with a few inches of margin at each end. The standard 30 to 36-inch hang height applies.
Materials and placement: Powder-coated steel, painted aluminum, or ceramic in a single color. Hang in a run of three to five over the island, aligned with the island’s centerline. In a galley kitchen, two cylinders over a peninsula keep the narrow room feeling open. Match the cylinder color to an appliance or the faucet for a quiet echo.
Effort: Low to moderate, depending on whether new wiring points are needed for a longer row.
Lower-cost alternative: DIY cylinders from large-format cardboard concrete-form tubes are a known maker project, but for real durability and safe heat handling, a budget-friendly metal cylinder pendant from a lighting retailer is the safer lower-cost path.
A practical tip: Narrow cylinders give a tight beam, so if your island doubles as homework or laptop space, add a wider-beam source nearby, like a dimmable overhead, so the whole surface is comfortable, not just the spots under the shades.
4. An Adjustable Head For Practical Use

The prettiest pendant is useless if the light lands in the wrong place. An adjustable-head pendant, one that tilts, swivels, or slides along a track, puts the beam exactly where the work happens. Aim it at the cutting board during dinner prep, then swing it back to center when the island becomes a serving station. This is the fixture for people who actually cook: it treats lighting as a tool that moves with the task. The mechanism itself can be handsome, with brass joints or a knurled knob that invites a hand.
What to measure: Measure the distance from the hang point to the farthest spot you will aim at. Most adjustable heads pivot 30 to 45 degrees, so the geometry matters: a pendant hung 33 inches above the counter can reach about a foot off center with a 30-degree tilt. Make sure the fixture’s weight is supported by a proper box rated for its weight.
Materials and placement: Metal shades with adjustable knuckle joints, swing-arm pendants, or single heads on an adjustable track. Mount over the primary prep zone of the island rather than centered for symmetry; function wins here. Keep the adjustment hardware clean and free of grease buildup with an occasional wipe.
Effort: Moderate. Adjustable fixtures are heavier and need secure mounting; an electrician should confirm the junction box rating.
Lower-cost alternative: A plug-in pendant with a swag hook lets you reposition the hang point without an electrician, and some plug-in models have tilting shades.
A practical tip: Decide the aim once and live with it for a week before fine-tuning. You will learn where your hands actually go during prep, and the final angle will be better than any first guess.
5. A Dimmable Option Where Compatible
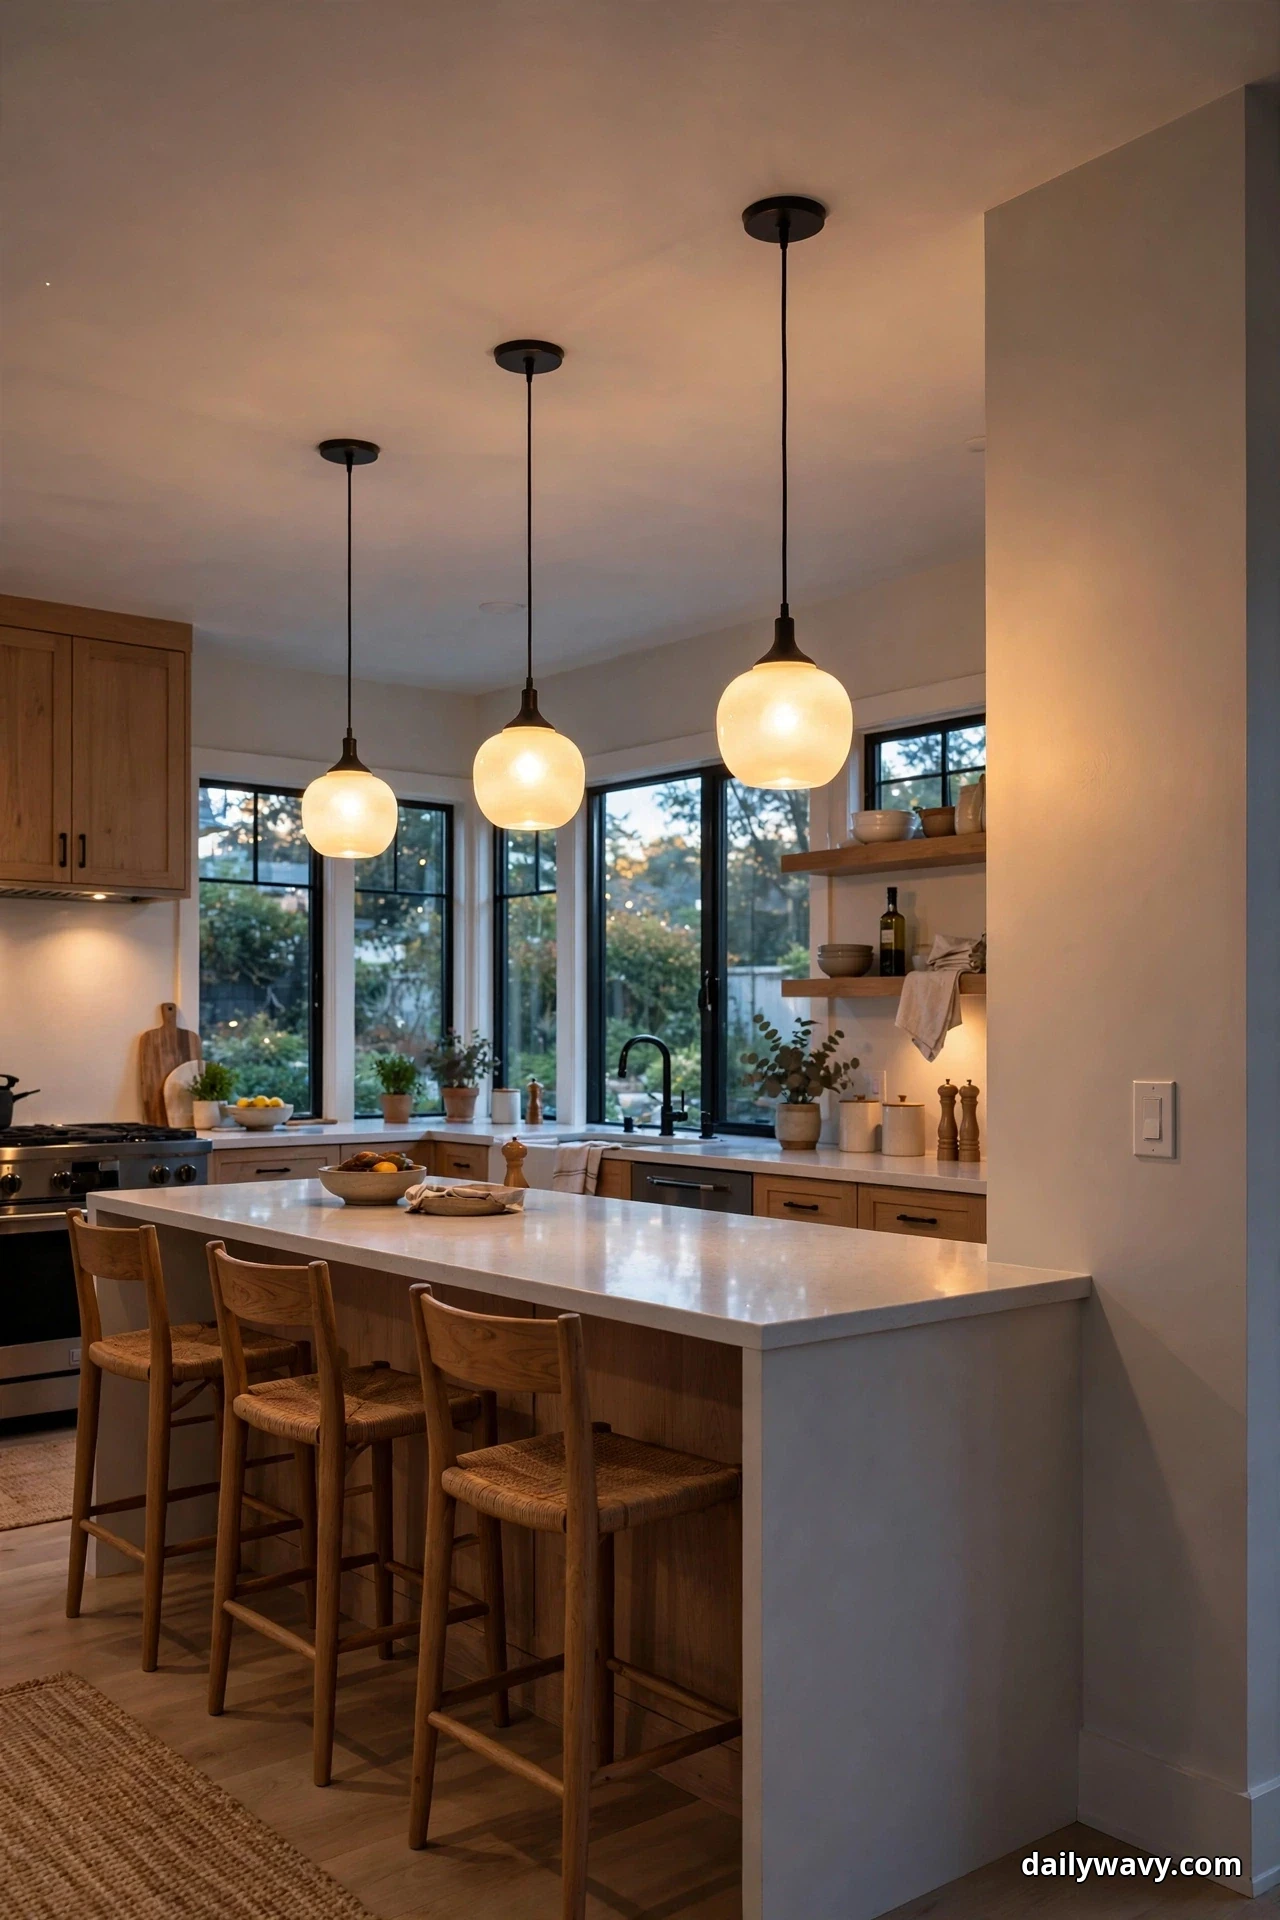
A kitchen lives many lives in one day: bright and businesslike at breakfast, focused during dinner prep, low and golden when the evening winds down. A dimmable pendant is the single upgrade that serves all of them. Full brightness for chopping and homework, a softened glow for lingering over dessert. The catch is compatibility: the bulb, the dimmer switch, and the fixture must all agree. Get that trio right and the pendant becomes the most-used light in the house, adjusted a dozen times a day without a thought.
What to measure: No special measurements beyond the standard hang height, but check the electrical box: dimmer switches are slightly deeper than standard switches and need enough room in the box. Note the total wattage of all pendants on the circuit and confirm the dimmer’s rating covers it.
Materials and placement: Choose fixtures labeled dimmable and pair them with dimmable LED bulbs and an LED-compatible dimmer switch (a trailing-edge or universal dimmer suits most LEDs). This applies to any pendant style: globes, domes, and cylinders can all dim if the components cooperate. Place the dimmer switch where you naturally reach when entering the kitchen.
Effort: Low if the wiring exists; swapping a standard switch for a dimmer is a common task, but turn off the breaker and follow local requirements, or hire an electrician for peace of mind.
Lower-cost alternative: Smart bulbs with app or voice dimming skip the new switch entirely. They cost more per bulb but install in seconds.
A practical tip: Test the full dimming range in the store’s return window. Some LED and dimmer pairings buzz or flicker at low levels; if yours does, swap the dimmer model before you live with it.
6. A Rounded Shape Softening Straight Lines
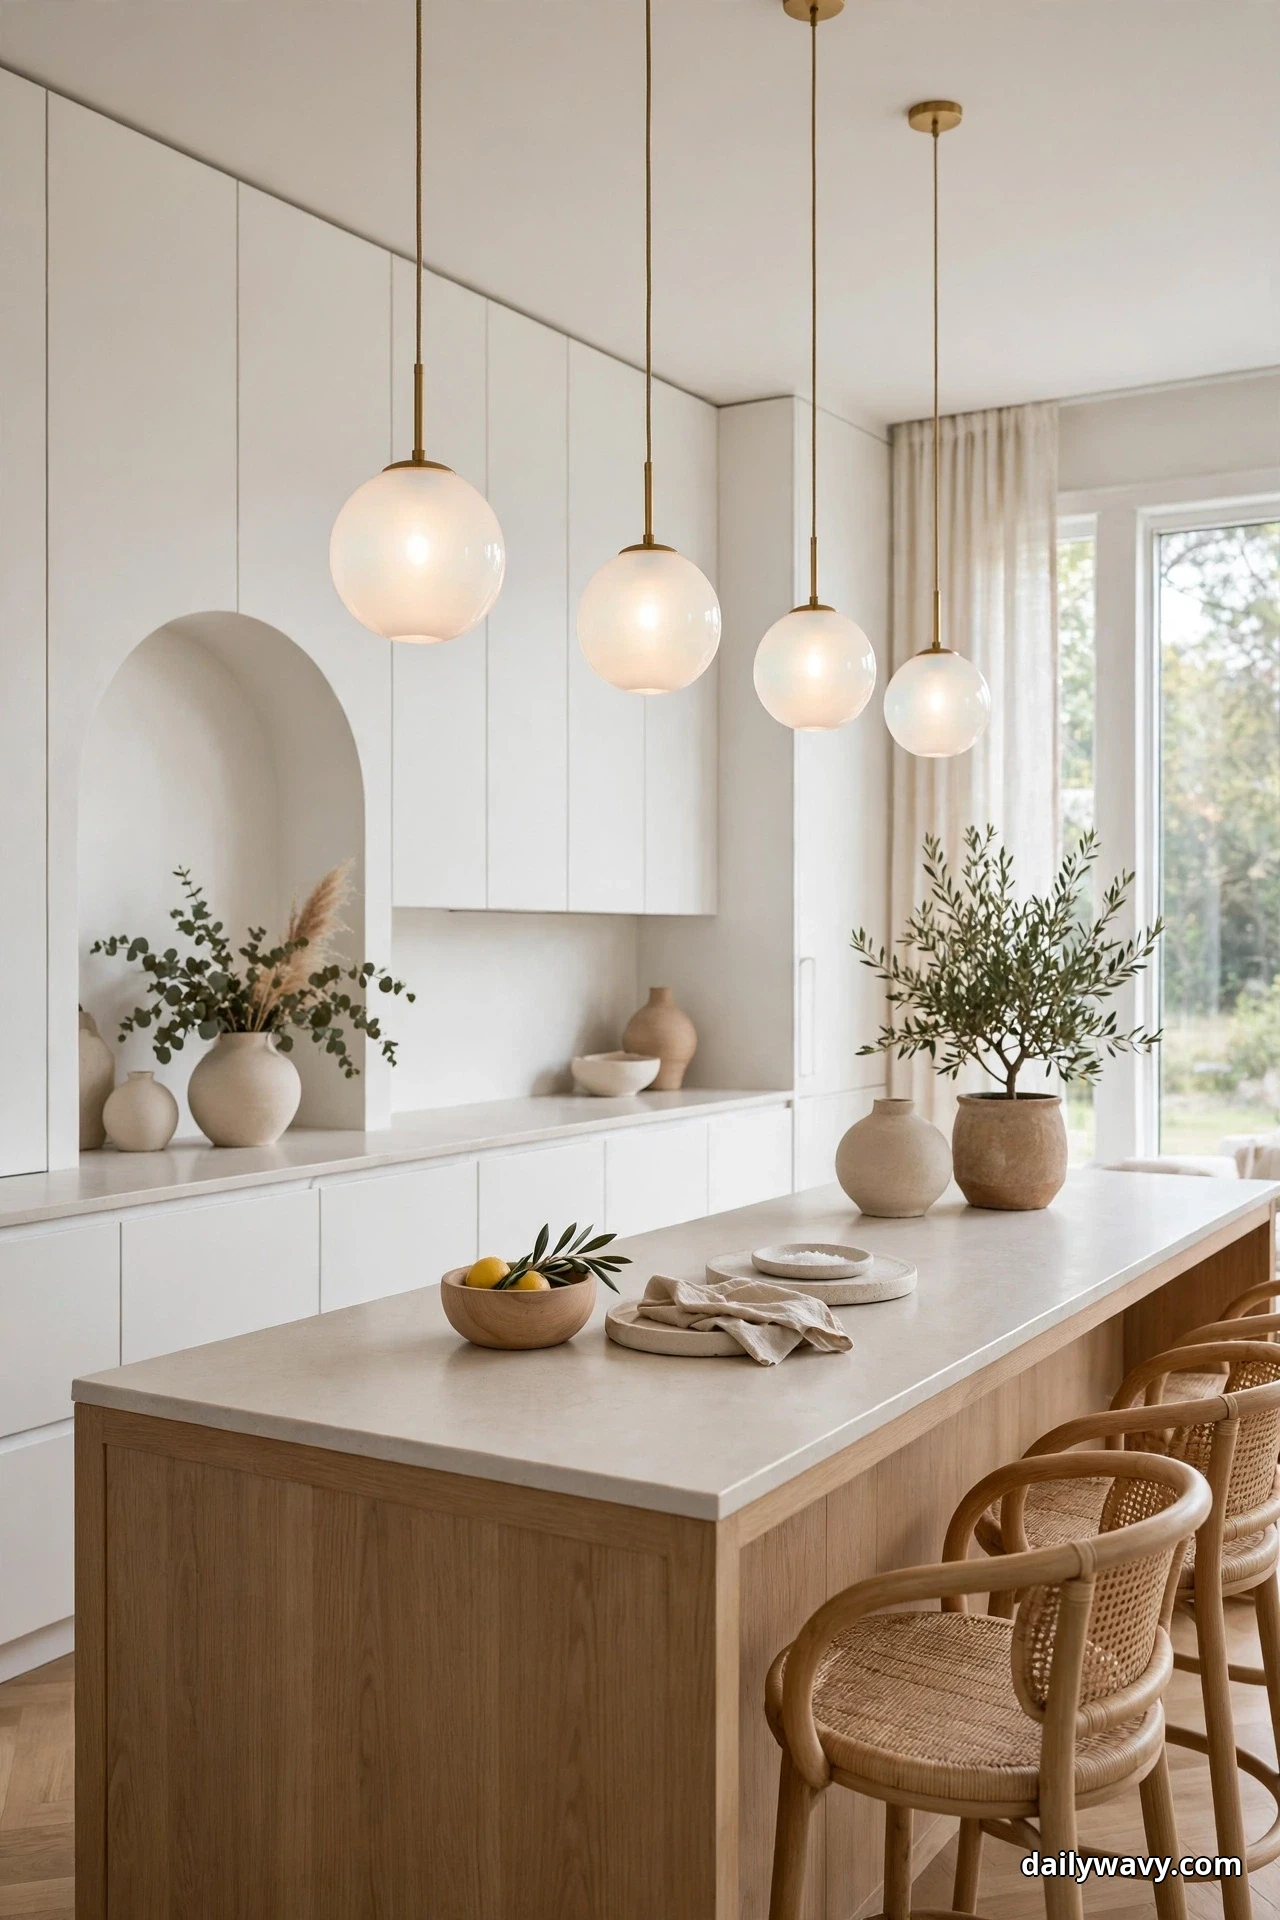
Kitchens are full of straight lines: the island’s long edge, the run of cabinets, the grid of tile. A rounded pendant, a globe, an orb, a soft dome, breaks that geometry the way a bowl of fruit breaks a bare counter. The curve draws the eye upward and makes the room feel less rigid, and because a sphere reads the same from every angle, it never looks awkward from the doorway or the dining area. Globe pendants also diffuse light evenly, so the island gets a gentle wash instead of hot spots.
What to measure: Globe diameter is the key number. A 10 to 14-inch globe suits a standard island; oversized 16 to 20-inch globes work over large islands or in rooms with high ceilings. Keep the standard 30 to 36 inches above the counter, and in rooms with ceilings above 9 feet, add roughly 3 inches of drop per extra foot of ceiling height to keep the fixture in the visual conversation.
Materials and placement: Opal or milk glass, frosted acrylic, or paper lantern style shades for the softest diffusion. Hang a row of matching globes over the island, or one large globe over a round breakfast table to echo its shape. In a linear kitchen, three identical globes create a calm, rhythmic line.
Effort: Low. Globes are light and widely available; standard mounting applies.
Lower-cost alternative: Paper lantern pendants give the same soft round glow for very little money, though they need more frequent replacement in a greasy kitchen environment.
A practical tip: Globes collect dust on top where you never see it until the light shines down. Give them a quick dust with a microfiber wand monthly, or the downward light will slowly dim without you noticing why.
7. A Ceramic Or Wood Accent On The Base
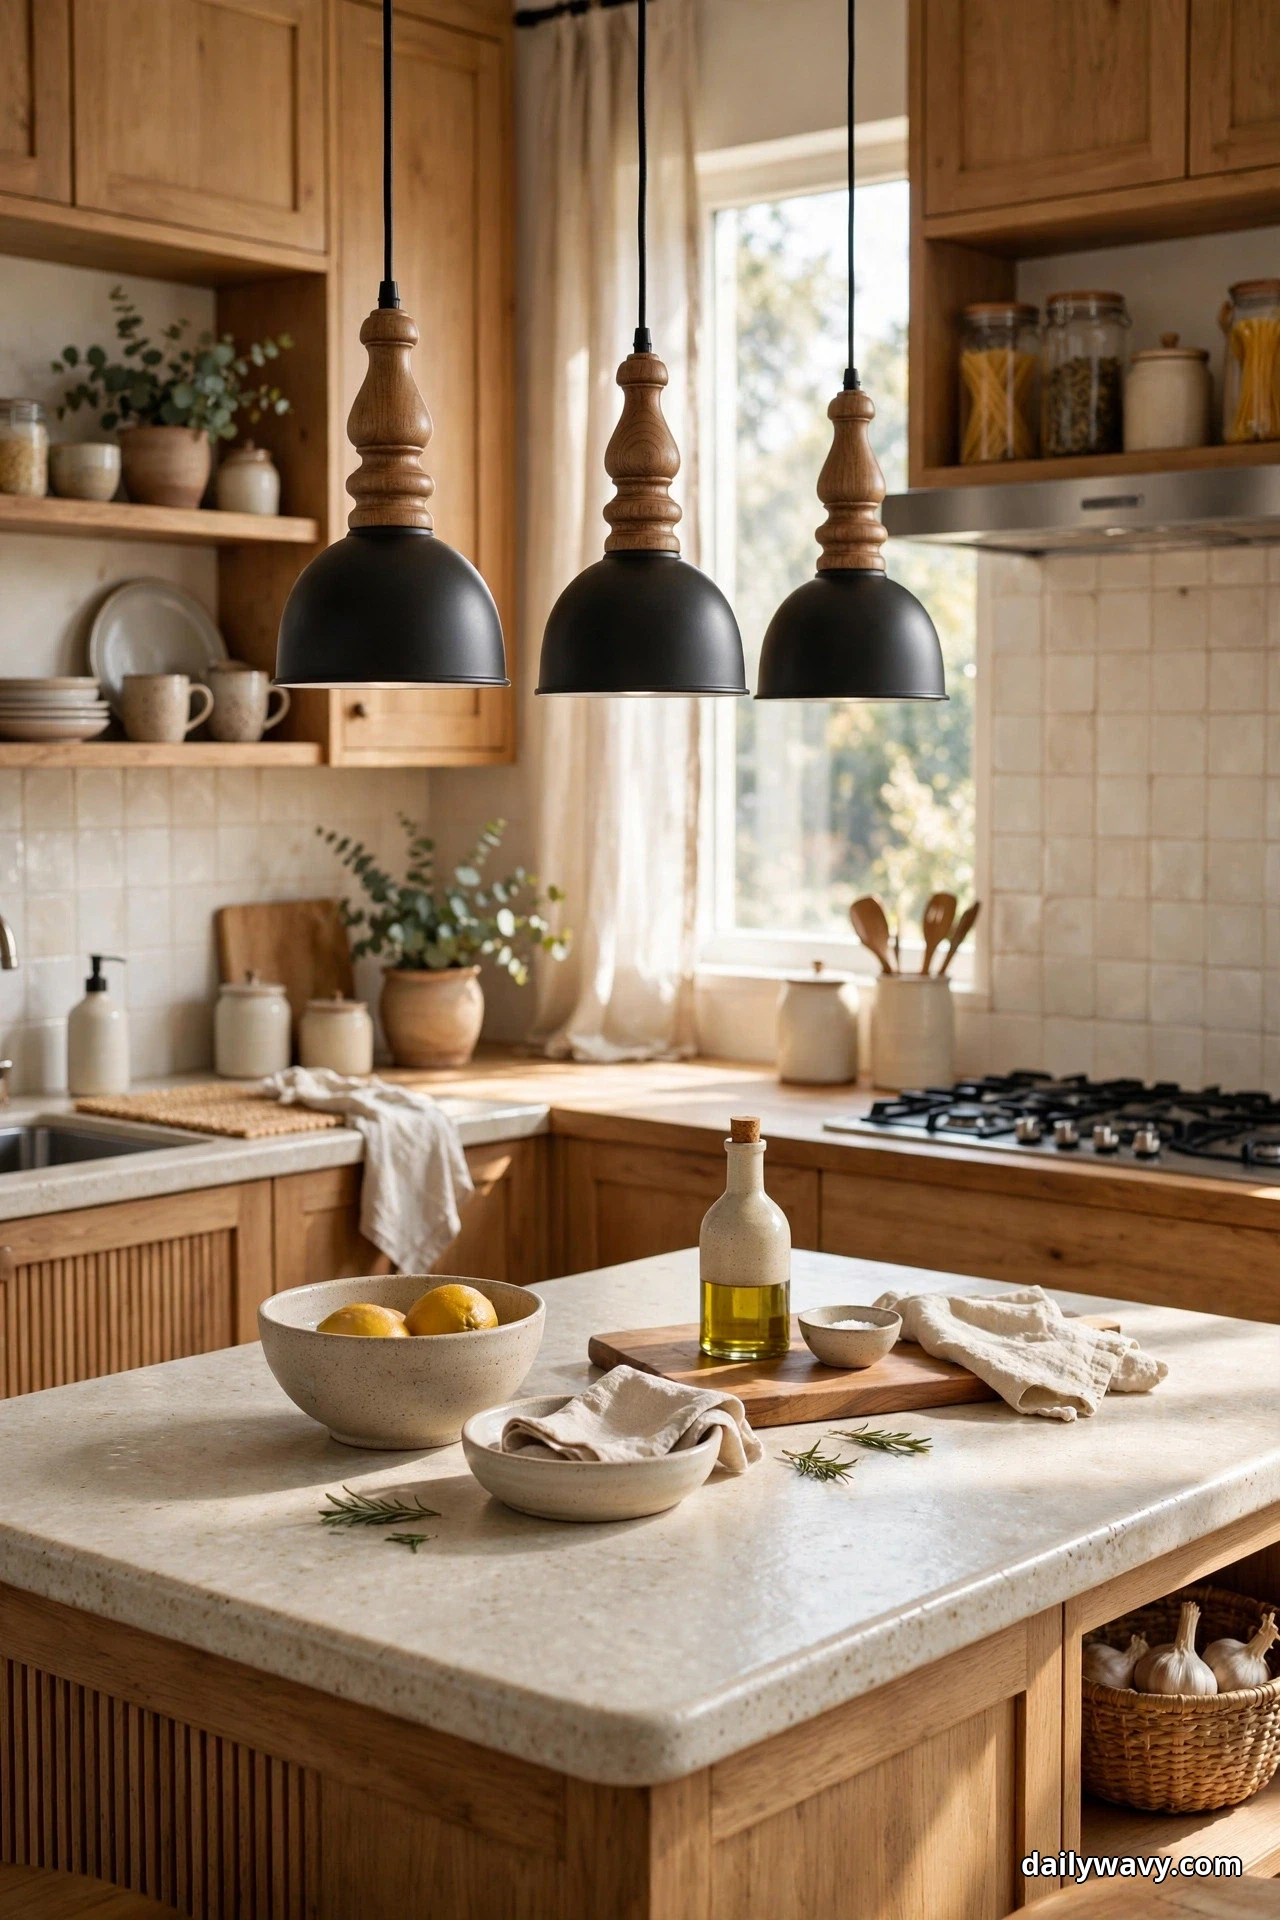
Metal and glass can feel cold in a kitchen that otherwise runs warm. A pendant with a ceramic collar, a turned-wood base, or a hand-thrown stoneware shade brings a crafted, human texture into the room. These materials catch light beautifully: ceramic glazes pool and vary, wood grain warms under a bulb’s glow. The fixture becomes a small piece of sculpture that happens to light the room. It pairs especially well with open shelving, butcher block, and handmade-look tile, where the handcrafted theme carries through.
What to measure: Ceramic and wood pendants are often heavier than they look, so confirm the fixture weight and check that the junction box is rated to support it. Measure the shade’s widest point for spacing, and keep the standard hang height so the textured surface sits at eye level where it can be appreciated.
Materials and placement: Glazed stoneware, terracotta, turned oak or walnut accents on an otherwise simple shade. Hang over the island in a pair, or use one over a coffee bar corner where its texture can be seen up close. Keep other wood tones in the room within the same warm family so the accent feels related.
Effort: Low to moderate; weight is the only extra consideration, handled at mounting time.
Lower-cost alternative: A plain glass pendant dressed with a wood-bead garland or a ceramic-look painted shade gives a hint of the texture at a fraction of the cost.
A practical tip: Wood near a cooktop needs a wipe-down routine. A light coat of food-safe mineral oil on accessible wood parts keeps the finish from drying out in the kitchen’s heat.
8. A Restrained Dark Fixture In A Light Room

In a bright, white kitchen, one restrained dark pendant is like a period at the end of a sentence: it gives the room definition. The trick is restraint. A single dark bronze or matte black fixture, modest in size, anchors the space without turning moody. It grounds the eye, outlines the island’s position in the room, and makes the surrounding white feel intentional rather than blank. This is the easiest way to add contrast if you are nervous about committing to a dark scheme.
What to measure: Because this is a single statement piece, proportion matters more than spacing. Measure the island and choose a shade diameter roughly one-third to one-half the island’s width. Hang at the standard 30 to 36 inches above the counter and step back to check the silhouette from the room’s main doorway.
Materials and placement: Dark bronze, oil-rubbed bronze, or matte black in a simple dome, cone, or drum shape. One fixture centered over the island, or a single pendant over a small peninsula. Repeat the dark tone once more in the room: a faucet, cabinet pulls, or a frame, so the pendant has company.
Effort: Low. One fixture, one junction box, simple swap in most cases.
Lower-cost alternative: A black drum shade is one of the most affordable pendant styles and achieves the same grounding effect in a white kitchen.
A practical tip: A single dark shade can look like a floating blob at night if the bulb is too bright and exposed. Choose a fixture that hides the bulb or pair it with a warm, lower-glare bulb so the fixture reads as a shape, not a beacon.
9. A Light Finish In A Dark Corner

Dark cabinetry and moody walls look stunning, but they swallow light. A pale pendant in a dark corner is the rescue move: a linen shade, a white glass globe, or a light rattan form glows like a small moon and pulls the corner back into the room. It balances the dark tones instead of fighting them, and because the shade itself is luminous, the corner feels intentional rather than forgotten. This is also the idea for windowless corners and galley kitchens where daylight never quite reaches.
What to measure: Measure the corner’s clearances: pendant shades need air on all sides, so keep at least 6 inches from walls and upper cabinets. In a dark kitchen, light output matters more than usual, so note the bulb’s lumen rating and choose toward the brighter end of what the fixture allows.
Materials and placement: White or natural linen shades, opal glass, pale rattan or wicker. Hang one over a dark corner counter, a coffee station tucked into a dark run of cabinets, or a small island in a dark kitchen. The light finish becomes the brightest object in the room, so keep it simple.
Effort: Low. Standard pendant mounting; the planning is in the placement, not the hardware.
Lower-cost alternative: A white paper globe pendant is inexpensive and throws beautifully soft light in a dark corner.
A practical tip: In dark kitchens, bounce matters. A light-colored backsplash or a pale runner rug near the pendant’s glow multiplies the effect, so the one fixture works like two.
10. A Compact Design Leaving Useful Surface Space

Small kitchens have no room for lighting that hogs the airspace. A compact pendant, slim, shallow, and modest, lights the work surface without looming over it. The visual difference is real: a petite shade leaves the sightline open and the counter feeling generous, while an oversized fixture in the same spot would make the room feel cramped. Compact does not mean dim; modern LED pendants pack plenty of output into small shades. This is the idea for galley kitchens, apartment kitchens, and islands that double as the only prep surface.
What to measure: Measure the counter depth and the room’s width. A compact pendant of 6 to 8 inches in diameter suits islands under 24 inches deep. Keep shades inside the counter’s footprint so heads never meet them, and maintain the 30 to 36-inch height so the compact shade still throws a useful pool of light.
Materials and placement: Small metal domes, mini glass globes, or slim cylinders in a light finish to keep the airy feel. Two small pendants over a narrow island, or one over a petite peninsula. In a galley, a single row down the center keeps both counters lit without cluttering the walkway’s headroom.
Effort: Low. Compact fixtures are light and simple to mount.
Lower-cost alternative: Mini pendant kits are among the least expensive hardwired fixtures, and many come in multi-packs meant for exactly this use.
A practical tip: Resist the urge to hang compact pendants higher to “open up” the room. Above 36 inches, the light pool shrinks and the task benefit fades. Keep them low enough to work.
11. A Layered Arrangement At Different Heights
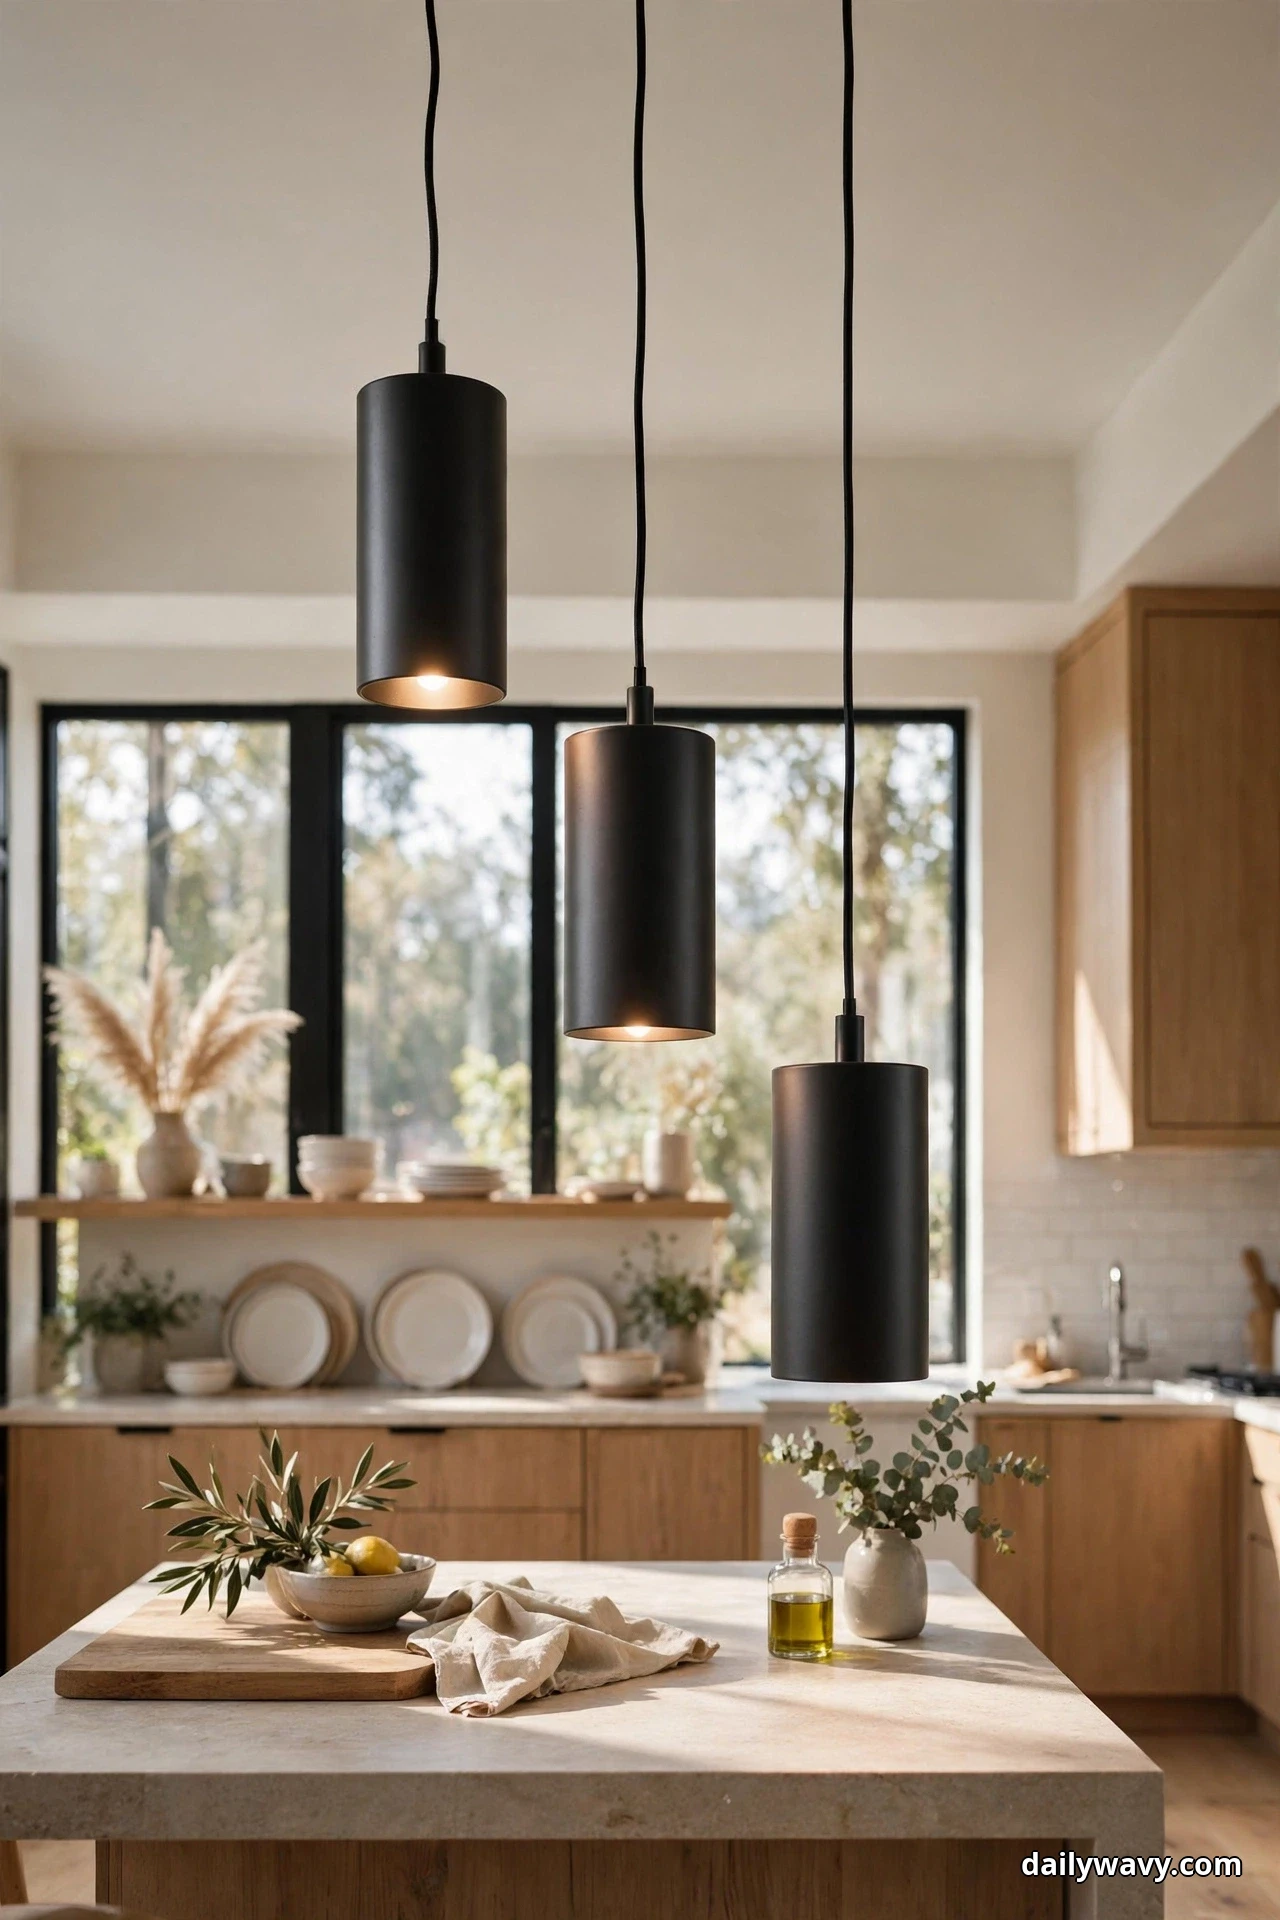
Symmetry is safe, but a staggered arrangement has rhythm. Hanging pendants at two or three different heights over an island creates a cascade that feels designed rather than installed. The varying drops catch the eye and make the ceiling height feel generous, and each shade still does its job because the differences are measured, not random. This works best with simple, identical shades, where the height variation is the whole design. It is the closest lighting gets to a mobile, and it softens a long, straight island beautifully.
What to measure: Plan the stagger on paper first. A 4 to 6-inch difference between adjacent pendants reads as intentional; more than 8 inches starts to look accidental. Keep the lowest shade at 30 inches above the counter and let the others step up from there. Measure from a fixed ceiling point so the stagger is precise.
Materials and placement: Identical small globes, domes, or cylinders in a single finish. Three pendants over a 6-foot island is the classic setup; five over a long island makes a real statement. Center the arrangement on the island, not the room, so it relates to the work surface.
Effort: Moderate. Each pendant needs its cord or stem cut to a different length, which takes careful measuring at install time. New wiring points need an electrician.
Lower-cost alternative: Adjustable-cord pendant kits let you set different heights yourself without custom cutting, and you can re-level them later if you change your mind.
A practical tip: Photograph the arrangement from the room’s main viewpoint before finalizing the cord lengths. The camera shows proportion problems your eyes miss in the moment.
12. A Warm Shaded Light Beside The Focal Area

Every kitchen has a focal area, usually the range, and it deserves its own light. A warm fabric-shade pendant hung beside the range washes the wall and the surrounding counter in a golden glow that makes the busiest corner feel inviting instead of industrial. The shade softens the light so there is no harsh glare on the cooktop, and the warmth flatters both food and faces. It is a small move with an outsized effect: the range wall stops being a utility zone and starts feeling like the heart of the room.
What to measure: Measure the distance from the range to the hang point; keep the pendant clear of the hood’s capture zone and at least 24 inches from the cooktop’s edge so heat and steam do not punish the shade. Fabric shades and cooking grease are not friends, so distance is the plan. Height follows the standard 30 to 36 inches above the adjacent counter.
Materials and placement: A fabric drum or tapered shade in warm linen or burlap tones, hung to one side of the range over a flanking counter. In an open kitchen, a matching pair can frame a wide range wall. Choose a shade with a washable or replaceable fabric if you cook often.
Effort: Low to moderate; placement near the range may need a new junction point and an electrician.
Lower-cost alternative: A plug-in fabric pendant on a swag hook gives the same warm beside-the-range glow without new wiring.
A practical tip: Grease film will settle on the shade over time. A monthly pass with a dry microfiber cloth keeps the fabric glowing instead of graying, and a quick check keeps the kitchen’s busiest light looking its best.
13. A Sculptural But Proportionate Fixture

Some pendants are art first and lighting second, and that is fine, as long as the proportions respect the room. A sculptural fixture, woven rattan, a folded metal form, a cluster of hand-blown glass, gives the kitchen a signature moment. The discipline is scale: the fixture should relate to the island the way a painting relates to its wall, generous but not overwhelming. A good rule is that the shade’s widest point stays under half the island’s width, so the sculpture frames the work zone instead of swallowing it.
What to measure: Measure the shade’s diameter and the island’s width, then check the ratio. Also measure the fixture’s weight: sculptural pieces are often the heaviest pendants, and the junction box must be rated for it. Confirm headroom around the fixture so tall family members do not duck.
Materials and placement: Woven rattan or seagrass, hand-blown glass clusters, folded or perforated metal. One sculptural pendant over a small island makes a gallery-like statement; over a long island, use one large piece centered rather than repeating it. Give it visual space: keep the surrounding counters calm so the fixture owns the moment.
Effort: Moderate. Weight and size make installation a two-person job, and new positions need an electrician.
Lower-cost alternative: A single large woven basket-style pendant from a home retailer gives much of the sculptural look at a modest price, and it is light enough for standard mounting.
A practical tip: Sculptural shades with open weaves leak light in all directions, which is atmospheric but weak for task work. Pair them with under-cabinet task lighting so the island stays genuinely usable.
14. A Simple Metal Finish Repeated Nearby

Cohesion is a design superpower, and the easiest way to get it is repetition. Choose a simple metal finish, brushed nickel, polished chrome, warm brass, for your pendants, then repeat it on the faucet, the cabinet pulls, and the range hood trim. The pendants stop being isolated objects and become part of a family. The room feels considered because the eye keeps finding the same note. This idea works with any pendant shape; the finish is the whole point. It is also the most forgiving approach for anyone who finds lighting decisions stressful.
What to measure: No special lighting measurements beyond the standard ones, but bring a finish sample when you shop. Metals vary wildly between brands: one company’s brushed nickel can read gray while another’s reads warm. Hold the sample against your faucet and hardware in your own kitchen’s light before committing.
Materials and placement: Metal pendants in the chosen finish: domes, cylinders, or simple shades. The repetition happens around the room, not just in the fixtures, so plan the full set: pendant finish, faucet, pulls, and any visible brackets or shelving hardware. Keep the metal family to one, or two at most, to protect the effect.
Effort: Low. The work is in the choosing, not the installing.
Lower-cost alternative: If new pendants are out of reach, repeat the finish with the small things first: matching cabinet pulls and a new faucet cost less than lighting and still tie the room together.
A practical tip: Photograph your existing metals in daylight and take the photo to the store. Memory is unreliable for finishes; the photo is not.
15. A Diffused Globe-Style Form
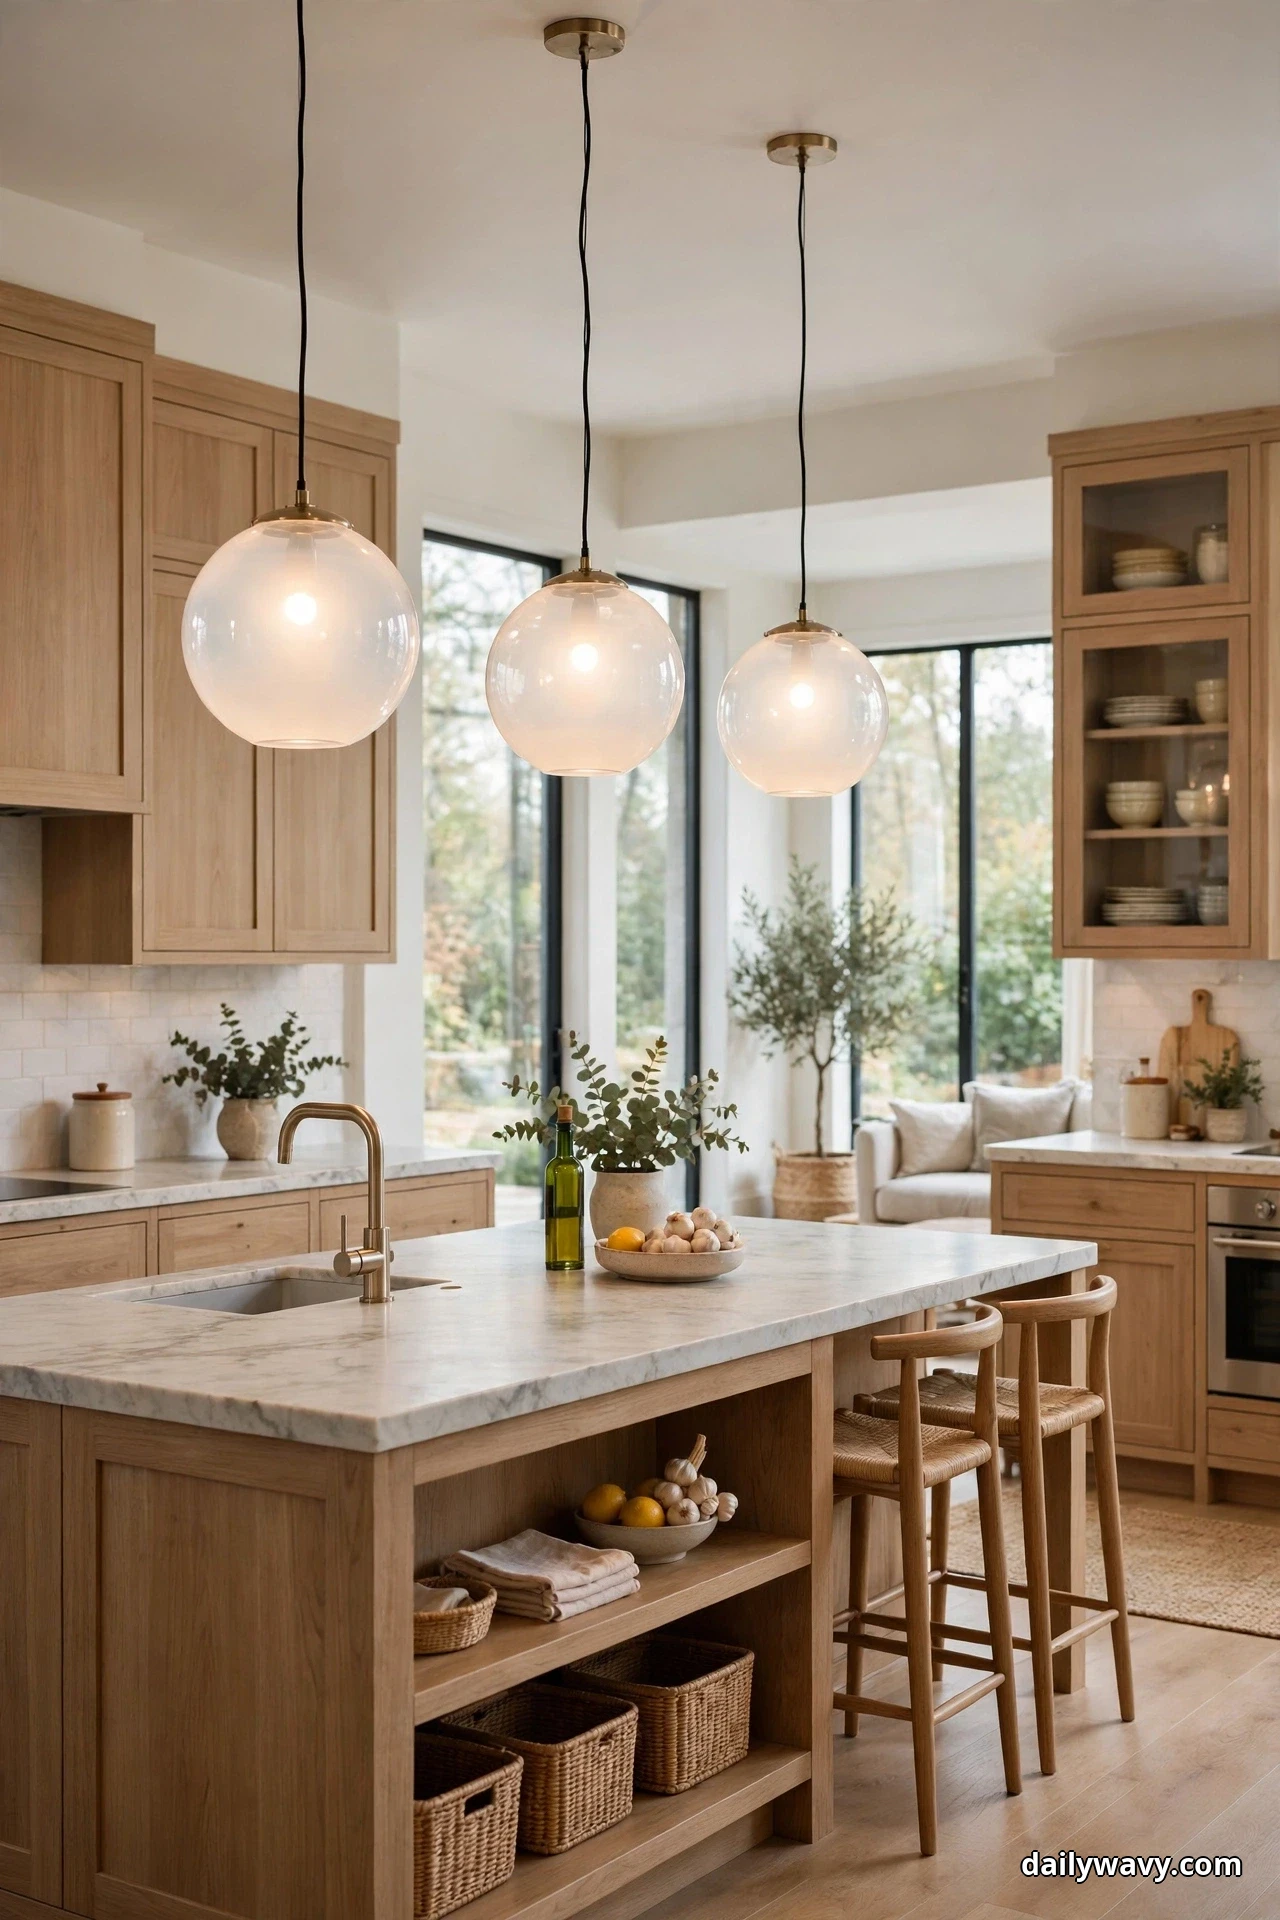
Harsh downlights make a kitchen feel like an operating room. A diffused globe, opal glass or frosted acrylic, spreads light in every direction with no hot spots and no hard shadows on faces. The result is the most flattering light in this roundup: food looks appetizing, people look rested, and the whole room glows instead of glaring. Diffused globes are the choice for kitchens that host as much as they cook, where the evening mood matters as much as the prep light. They are also merciful with imperfect ceilings, since the soft light hides flaws.
What to measure: Diffused globes read best in groups of three over a standard island; measure the island length and space them 24 to 30 inches apart. Globe diameter of 10 to 14 inches suits most rooms. Because the light spreads everywhere, hang at the standard 30 to 36 inches and resist going higher, or the soft light dissipates before it reaches the counter.
Materials and placement: Opal or milk glass, frosted acrylic for shatter resistance in busy family kitchens. A row over the island is the classic move; a single globe over a breakfast nook makes the morning table glow. Pair with a dimmer to take the diffusion from bright task light to candle-soft evening light.
Effort: Low. Standard mounting, widely available sizes.
Lower-cost alternative: Frosted glass globes are already among the most affordable pendant styles, so the budget version is simply a smaller diameter in the same style.
A practical tip: Diffused light is gentle, which means it contributes less punch to the exact spot where you chop. Keep one focused task light, like an under-cabinet strip over the main prep zone, so detail work never suffers.
16. A Narrow Fixture In A Tight Space
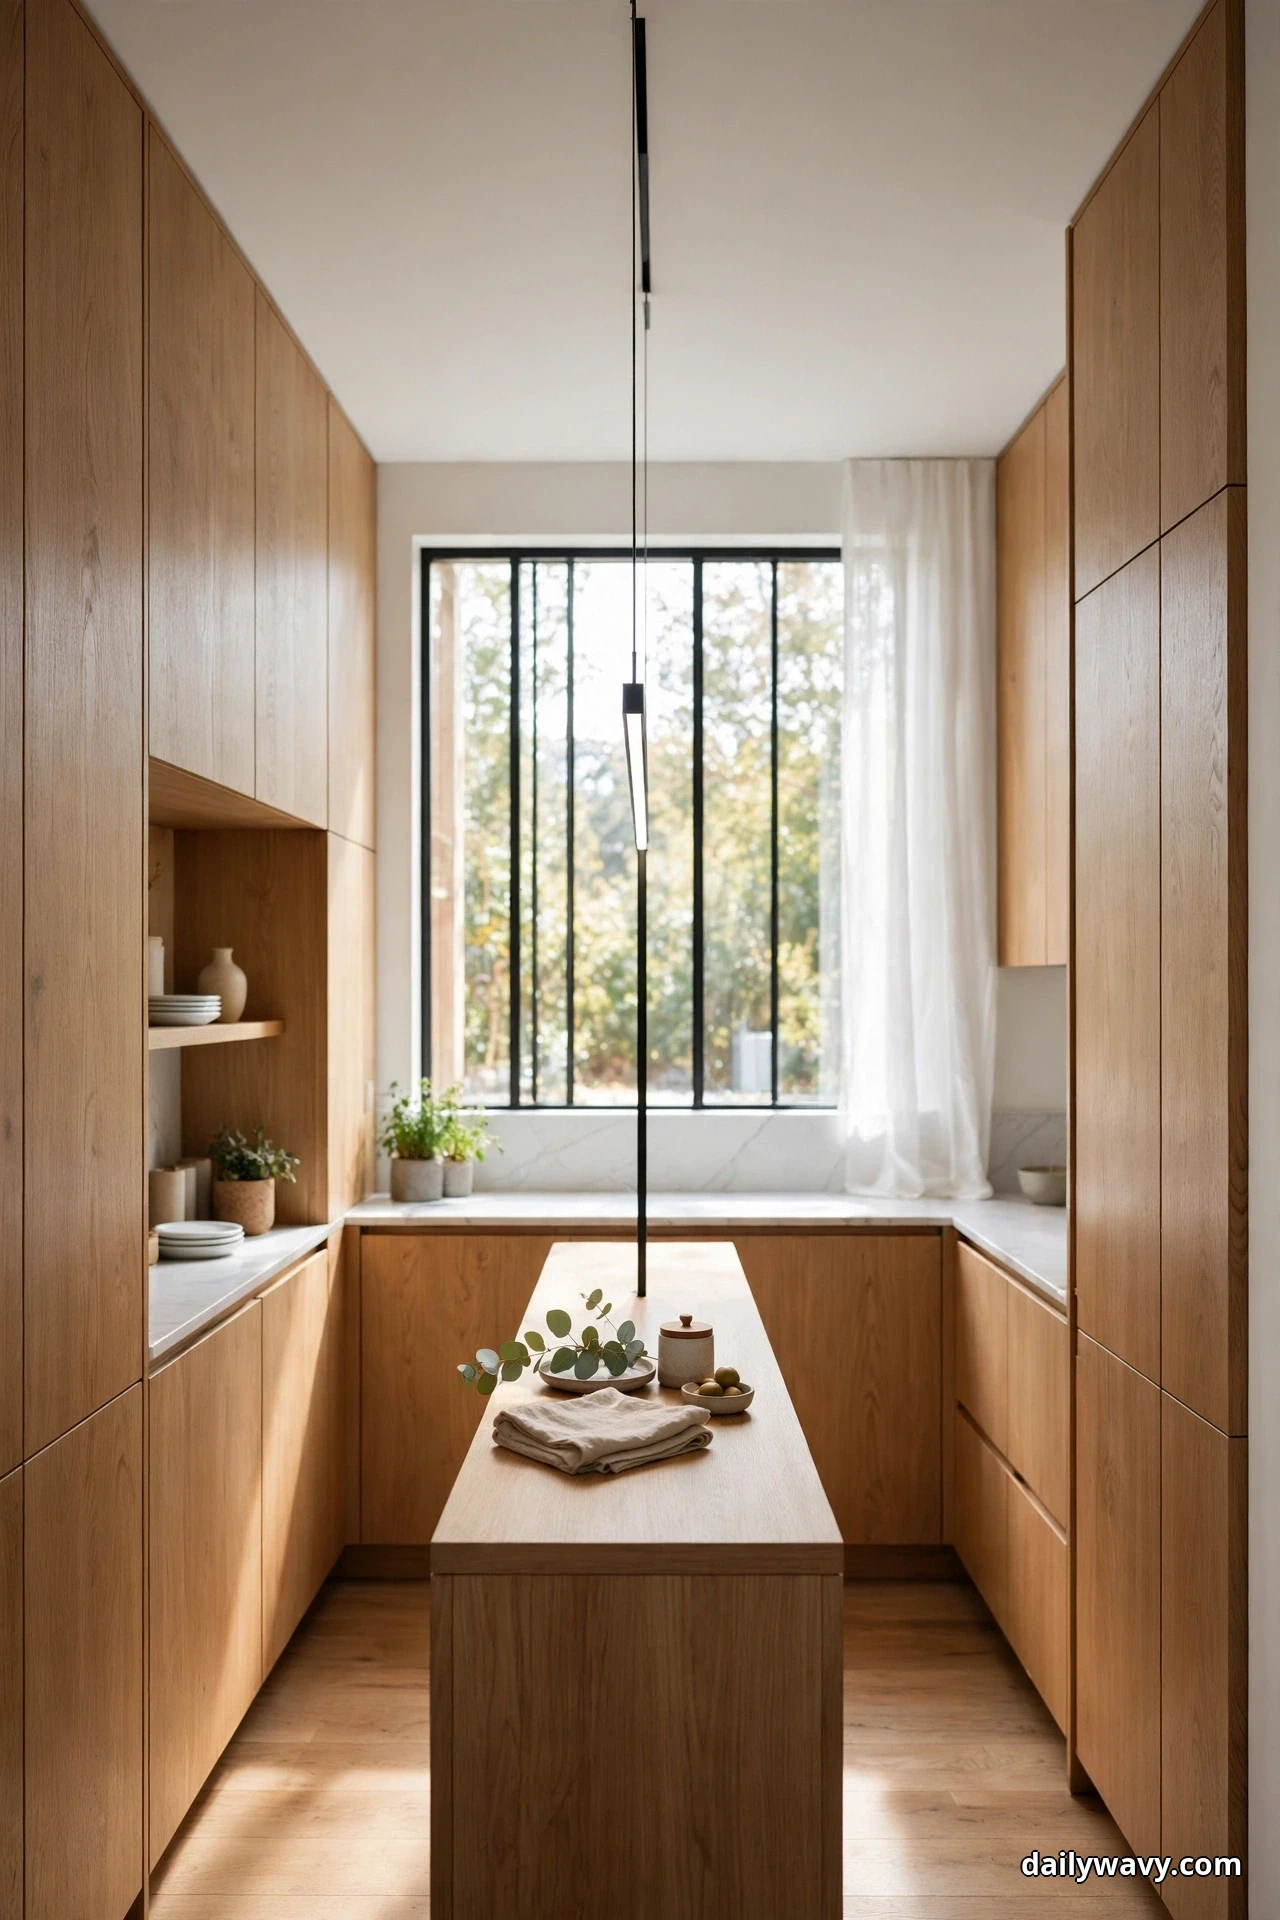
Tight kitchens need lighting that respects the walkway. A narrow fixture, a slim linear bar, a single skinny cylinder, or a petite track, delivers light along the counter without stealing headroom or sightlines. In a galley kitchen, a linear pendant running the length of the island lights the whole work surface from one elegant element. The narrow profile also suits islands with seating: diners can see each other across the counter without a row of shades blocking the view. Small space, considered light, no compromise.
What to measure: Measure the walkway width first. Keep the fixture’s width under one-third of the narrowest walkway so it never feels intrusive. For a linear fixture, measure the counter length and choose a bar that spans roughly two-thirds of it. Hang at the standard height, and confirm the fixture clears the tallest person who will use the kitchen.
Materials and placement: Slim linear LED bars, single narrow cylinders, or a short track with two small heads. Center on the island or the main counter run. In a galley, one linear fixture down the middle serves both sides; over a narrow peninsula, a slim bar keeps the open side feeling open.
Effort: Low to moderate. Linear fixtures are light, but a long bar may need two mounting points and an electrician for new wiring.
Lower-cost alternative: A simple two-head track in a basic finish costs little and gives adjustable, narrow-profile light that you can aim where the work is.
A practical tip: In a tight kitchen, the pendant is in everyone’s peripheral vision, so choose a finish that disappears: white on a white ceiling, or a tone that matches the cabinetry. The light should be noticed, not the fixture.
Frequently Asked Questions
How high should kitchen pendant lights hang?
The widely used rule of thumb is 30 to 36 inches from the countertop to the bottom of the shade over an island, which keeps sightlines open while the light lands where you work. In rooms with ceilings above 9 feet, add about 3 inches of drop for each extra foot of ceiling height. Over a dining table, the same range from the tabletop works, and anywhere people walk beneath the fixture, keep at least 6 feet of clearance.
How many pendants do I need over my kitchen island?
A common guideline is one pendant per 2 feet of island, spaced 24 to 30 inches apart. A 5-foot island usually takes two, a 6 to 7-foot island takes three, and an 8-foot island can carry three with generous spacing. Shade size matters too: wider shades need fewer fixtures, narrow ones can be grouped more tightly.
Can I install pendant lights myself, or do I need an electrician?
Swapping a pendant onto an existing, properly rated junction box is a task many confident homeowners handle themselves, with the breaker off and the manufacturer’s instructions followed. Anything involving new wiring, new junction boxes, or moving a fixture’s location should be done by a licensed electrician and must follow your local electrical requirements.
What color temperature is best for kitchen pendants?
For most kitchens, 2700K to 3000K gives warm, appetizing light that flatters both food and people. Cooler temperatures above 3500K can make a kitchen feel clinical, though some cooks prefer 3500K over a dedicated prep zone for its crispness. Whatever you choose, keep all the pendants in one kitchen at the same temperature so the light reads as one layer.
Are pendants enough to light the whole kitchen?
Rarely on their own. Pendants are excellent task and accent lighting for the island and focal areas, but a well-lit kitchen layers them with ambient light (recessed fixtures or a central ceiling light) and under-cabinet task lighting for the perimeter counters. Plan all three layers together rather than hoping the pendants will do everything.
How do I clean pendant shades without damaging them?
Dust metal and glass shades monthly with a dry microfiber cloth or a soft duster; the tops of shades collect surprising amounts of dust that dims the downward light. For glass, a damp cloth with a drop of mild dish soap handles grease film, then dry to avoid spots. Fabric shades need only dry dusting, and paper shades should never get wet. Always let bulbs cool and, for hardwired fixtures, switch the breaker off before any cleaning that involves moisture.
Find the Fixture That Works as Hard as You Do
Sixteen ideas, one shared principle: the best pendant is the one that fits your room’s measurements, your cooking habits, and your daily rhythm. Pick the idea that matches your kitchen’s real conditions, measure twice before you buy, and let the light do the quiet work of making the room feel finished. The right fixture will not just brighten the island; it will change how the whole kitchen feels at the end of the day.
If lighting has you rethinking the room around it, keep going. A considered entryway sets the tone when you walk in (small entryway ideas), a well-planned living room keeps the open plan feeling calm (narrow living room layouts), and more room-by-room guides live in our Home and Decor collection. And when the dining table needs the same treatment, our dining room pendant ideas give it the same measure-first approach.