16 Peanut Butter No-Bake Dessert Ideas When You Want to Skip the Oven
A peanut butter dessert that never meets the oven is one of the easiest wins in the kitchen. Creamy peanut…
A peanut butter dessert that never meets the oven is one of the easiest wins in the kitchen. Creamy peanut butter firms up beautifully in the refrigerator, melted chocolate sets into a clean snap, and crushed biscuits give you a proper crust without a preheat. Below you will find 16 complete no-bake peanut butter dessert ideas, each with real ingredient amounts, clear chilling times, and honest storage guidance. Every recipe here is made without raw flour or raw eggs, and every one sets in the fridge or freezer. Pick one for tonight, or save the list for the next hot afternoon when the oven stays off. (For another make-ahead morning favorite, see our apple cinnamon overnight oats.)
Jump to an idea
- Peanut Butter Refrigerator Tart
- Peanut Butter Icebox Cake
- Peanut Butter Pudding Cups
- Peanut Butter Filled Dates
- Peanut Butter Whipped Dessert Bowls
- Peanut Butter Chilled Coconut Bites
- Peanut Butter Biscuit Sandwiches
- Peanut Butter Pretzel Dessert Cups
- Peanut Butter Frozen Yogurt Bites
- Peanut Butter Dessert Dip
- Peanut Butter Chia Pudding
- Peanut Butter No-Bake Cereal Clusters
- Peanut Butter Whipped Ricotta Cups
- Peanut Butter Layered Fruit Fool
- Peanut Butter Mousse Cups
- Peanut Butter Biscuit-Layer Jars

How No-Bake Peanut Butter Desserts Actually Set
No-bake desserts are not magic, they are chemistry you can see. Four setting methods do almost all the work in this list.
Cold fat firms up. Butter, coconut oil, and chocolate are fluid when warm and solid when cold. That is why a pressed biscuit crust holds together after two hours in the fridge, and why a chocolate shell on a frozen bite gives that clean snap. Work quickly when a recipe uses melted chocolate, and chill the pan before you start on a warm day.
Whipping builds structure. Heavy cream whipped to soft or medium peaks traps air, and cream cheese gives it backbone. Fold gently, never stir, or the air escapes and the filling turns dense. If your cream refuses to whip, the bowl or cream was too warm; chill both for 15 minutes and try again.
Absorption thickens. Chia seeds and instant pudding mix swell as they soak up liquid. Chia needs at least 8 hours in the fridge to lose its crunch and turn silky, so do not rush it. Instant pudding thickens in a few minutes at room temperature and firms further as it chills.
Freezing makes it scoopable or snappy. Frozen yogurt bites firm in the freezer, not the fridge. Keep frozen desserts frozen until serving; move them to the fridge 10 minutes before eating only if you want a softer bite.
A word on food safety, because most of these contain dairy. Refrigerate dairy-based desserts within 2 hours of making them (1 hour if it is above 90°F), keep them at 40°F or below, and eat most creamy refrigerated desserts within 3 to 4 days. Lower-moisture desserts keep longer: biscuit sandwiches up to 1 week, coconut bites up to 2 weeks, and cereal clusters up to 2 weeks refrigerated. Frozen yogurt bites keep up to 2 months in an airtight container; thaw in the refrigerator, never on the counter. None of the recipes below use raw flour or raw eggs, so there is no flour-borne illness risk to worry about.
1. Peanut Butter Refrigerator Tart

This is a showpiece-worthy tart: a fluted tart with a buttery graham crust, a thick cloud of peanut butter filling, and a glossy chocolate drizzle. It slices cleanly after a proper chill, and every slice shows three distinct layers.
You need (makes one 9-inch tart, 10 to 12 slices):
- 1 1/2 cups graham cracker crumbs
- 6 tablespoons unsalted butter (melted)
- 2 tablespoons sugar
- 8 oz cream cheese (room temperature)
- 1 cup creamy peanut butter
- 1 cup powdered sugar
- 1 teaspoon vanilla extract
- 1 1/2 cups heavy cream
- 1/2 cup semi-sweet chocolate chips
- 1/4 cup heavy cream (for ganache)
- 2 tablespoons crushed roasted peanuts
Method: Mix the crumbs, melted butter, and sugar, then press firmly into a 9-inch tart pan with a removable bottom, building the sides up. Chill 30 minutes. Beat the cream cheese, peanut butter, powdered sugar, and vanilla until completely smooth. In a separate bowl, whip the 1 1/2 cups cream to medium peaks and fold it into the peanut butter mixture in two additions. Spread into the chilled crust and smooth the top. Melt the chocolate chips with the 1/4 cup cream in 20-second microwave bursts, stirring until glossy, and drizzle over the tart. Sprinkle with crushed peanuts.
Timing: Chill at least 4 hours, or overnight for the cleanest slices. Run a thin knife around the edge before releasing the pan.
Troubleshooting: If the crust crumbles when sliced, it was under-pressed; next time, tamp it down hard with the flat bottom of a measuring cup. If the filling is lumpy, the cream cheese was too cold; it must be genuinely room temperature before beating.
Storage: Cover and refrigerate up to 4 days. The tart does not freeze well; the filling can turn grainy when thawed.
Why it works: The tart shell gives you crunch, the mousse filling stays light because of the folded whipped cream, and the bitter chocolate drizzle keeps the sweetness in check. The filling stays silky because it never sees heat.
2. Peanut Butter Icebox Cake

An icebox cake is one of the easiest layered desserts there is, and peanut butter makes it richer. Thin chocolate wafer cookies soften overnight into cake-like layers between rows of peanut butter whipped cream.
You need (serves 8 to 10):
- 1 1/2 cups heavy cream
- 3/4 cup creamy peanut butter
- 1/2 cup powdered sugar
- 1 teaspoon vanilla extract
- about 30 thin chocolate wafer cookies
- 2 tablespoons crushed peanuts
- chocolate shavings for the top
Method: Whip the cream to soft peaks, then beat in the peanut butter, powdered sugar, and vanilla until you have firm, spreadable peaks. Do not overbeat or the mixture turns grainy. Spread a thin layer of cream in a 9×5-inch loaf pan lined with plastic wrap. Add a single layer of wafers, breaking a few to fill gaps. Repeat layers, ending with cream. Fold the plastic over the top and chill at least 8 hours or overnight. Unwrap, slice, and scatter the crushed peanuts and chocolate shavings over the top just before serving.
Timing: 8 hours minimum. The cookies need that long to absorb moisture and turn cakey.
Troubleshooting: If the cake slides apart when sliced, it was under-chilled. Give it the full overnight rest, and use a hot dry knife, wiped between cuts, for clean layers.
Storage: Refrigerate up to 3 days. It softens further each day, so day two is the sweet spot for texture.
Why it works: The contrast is the whole point: crisp-edged wafers gone soft against cool, airy peanut butter cream. It tastes like a peanut butter chocolate cake with a fraction of the effort.
3. Peanut Butter Pudding Cups

Pudding cups are weeknight-fast. Instant pudding does the setting work, peanut butter folds in for richness, and a whipped cream cap makes each cup look finished.
You need (makes 6 cups):
- One 3.9-oz box instant chocolate pudding mix
- 2 cups cold milk
- 1/2 cup creamy peanut butter
- 1 cup heavy cream
- 2 tablespoons powdered sugar
- 3 tablespoons crushed salted peanuts
Method: Whisk the pudding mix with the cold milk for 2 minutes until it thickens. Whisk in the peanut butter until no streaks remain. Spoon into six small cups or ramekins. Whip the cream with the powdered sugar to soft peaks and dollop over each cup. Sprinkle with crushed peanuts and chill at least 2 hours.
Timing: 2 hours to set fully; the pudding firms as it chills.
Troubleshooting: If the pudding is thin, the milk was too warm; it must be cold from the fridge. If the peanut butter leaves streaks, warm it 10 seconds in the microwave first so it blends smoothly.
Storage: Cover each cup and refrigerate up to 3 days. The whipped cream topping is best on day one.
Why it works: Instant pudding gives you a dependable set every time, and the peanut butter makes it taste like a candy bar in a cup. It is one of the quickest ideas on this list to assemble.
4. Peanut Butter Filled Dates
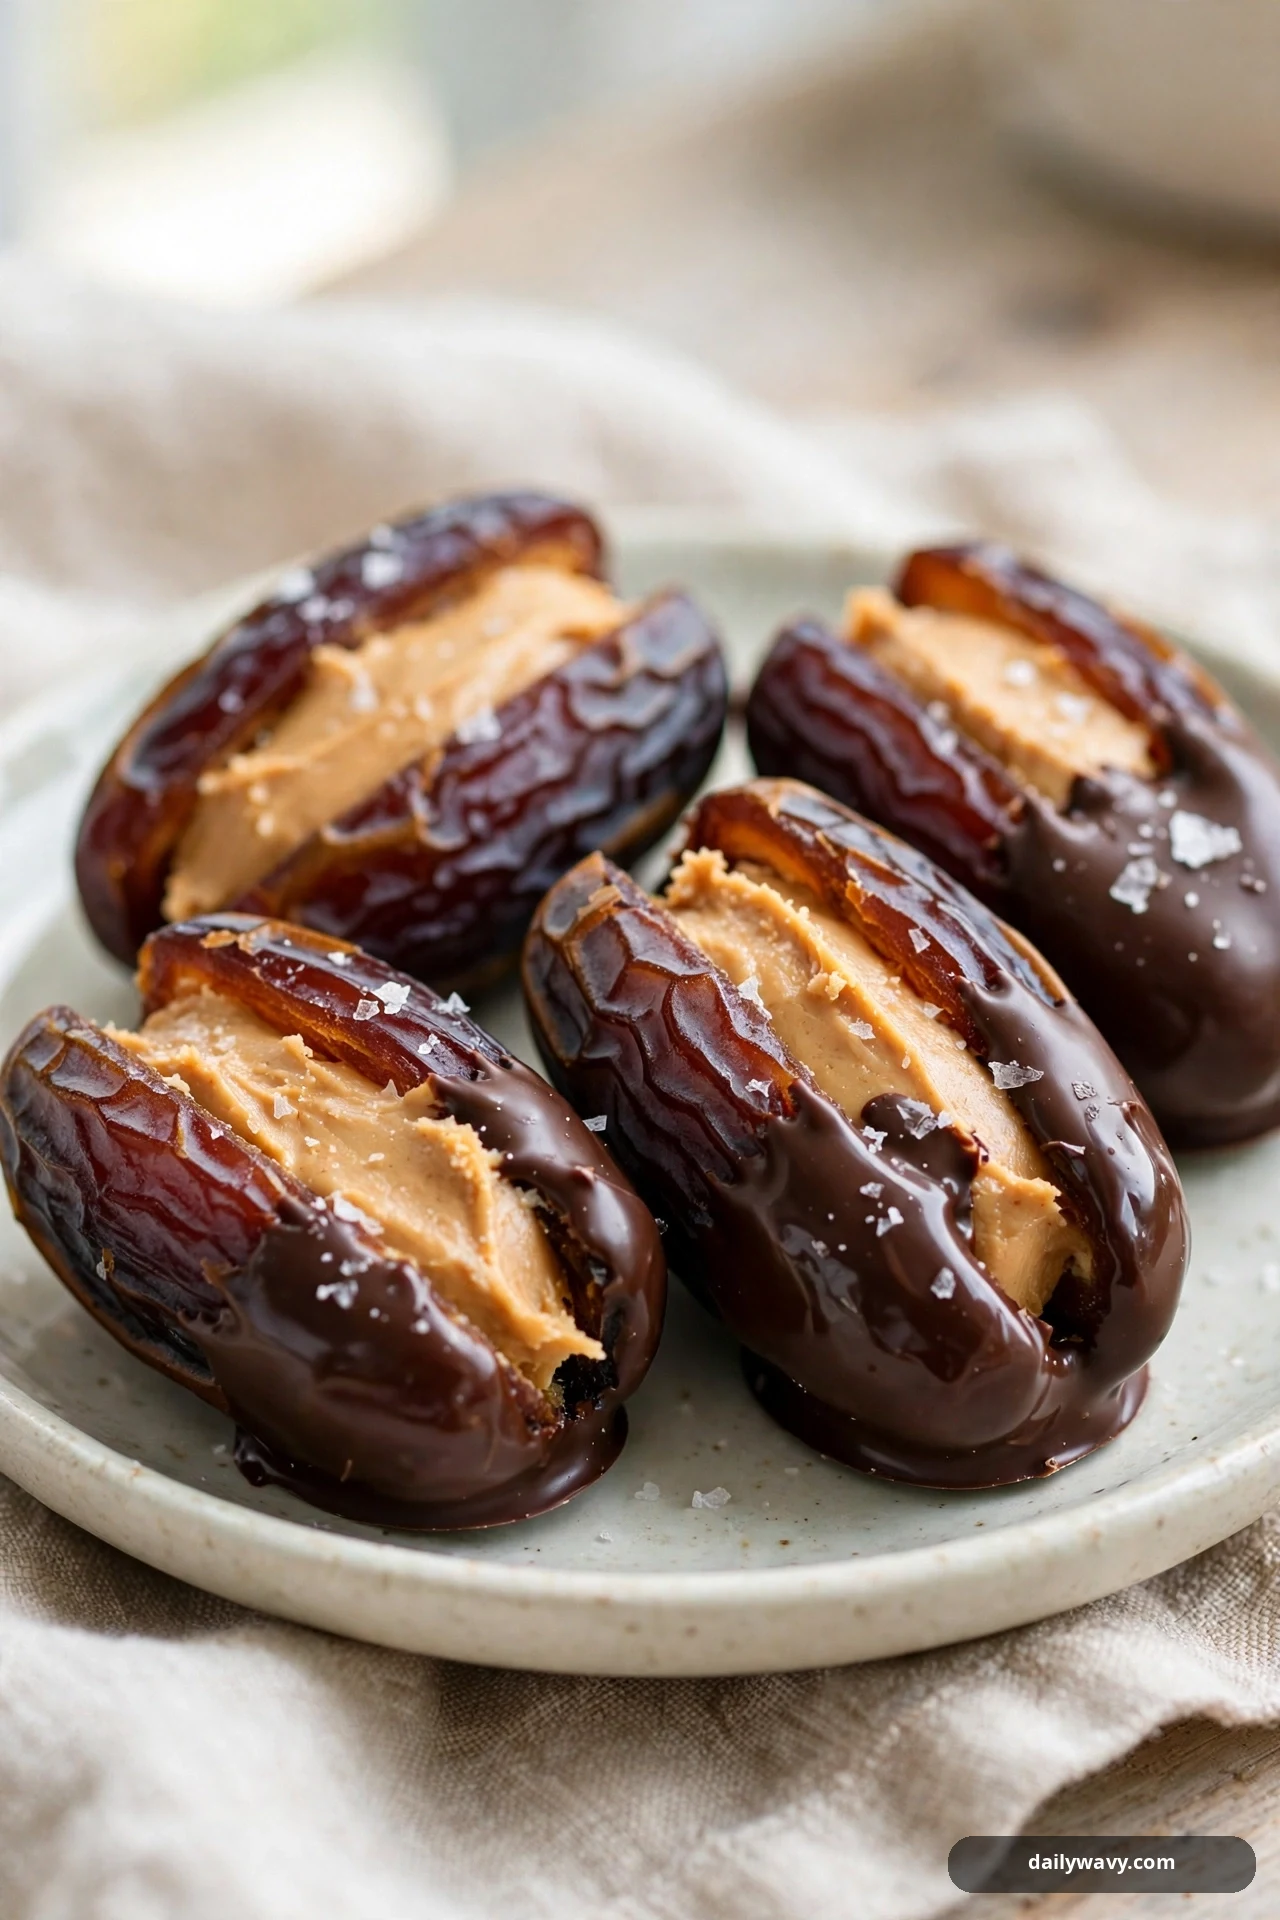
Medjool dates are nature's caramel, and a peanut butter center plus a chocolate dip turns them into a two-bite dessert that tastes far more indulgent than its ingredient list.
You need (makes 12):
- 12 large Medjool dates
- 1/2 cup creamy peanut butter
- 2 tablespoons maple syrup
- 4 oz dark chocolate (chopped)
- 1 teaspoon coconut oil
- flaky sea salt
Method: Slit each date lengthwise and remove the pit. Stir the peanut butter with the maple syrup until smooth and pipe or spoon it into the dates. Melt the chocolate with the coconut oil in 20-second microwave bursts, stirring until smooth. Dip the bottom half of each date in chocolate, set on parchment, and sprinkle with a pinch of flaky salt. Chill 30 minutes until the chocolate sets.
Timing: 30 minutes in the fridge; 15 minutes in the freezer if you are in a hurry.
Troubleshooting: If the chocolate is thick and gloopy, it got too hot; keep bursts short and stir well. If the peanut butter oozes out, you overfilled; about 2 teaspoons per date is plenty.
Storage: Refrigerate in an airtight container up to 1 week. They are also good at cool room temperature for a day.
Why it works: Chewy date, salty-sweet peanut butter, bitter chocolate, flaky salt, four textures and four flavors in one bite. Choose certified gluten-free, dairy-free chocolate to keep it gluten-free and dairy-free.
5. Peanut Butter Whipped Dessert Bowls
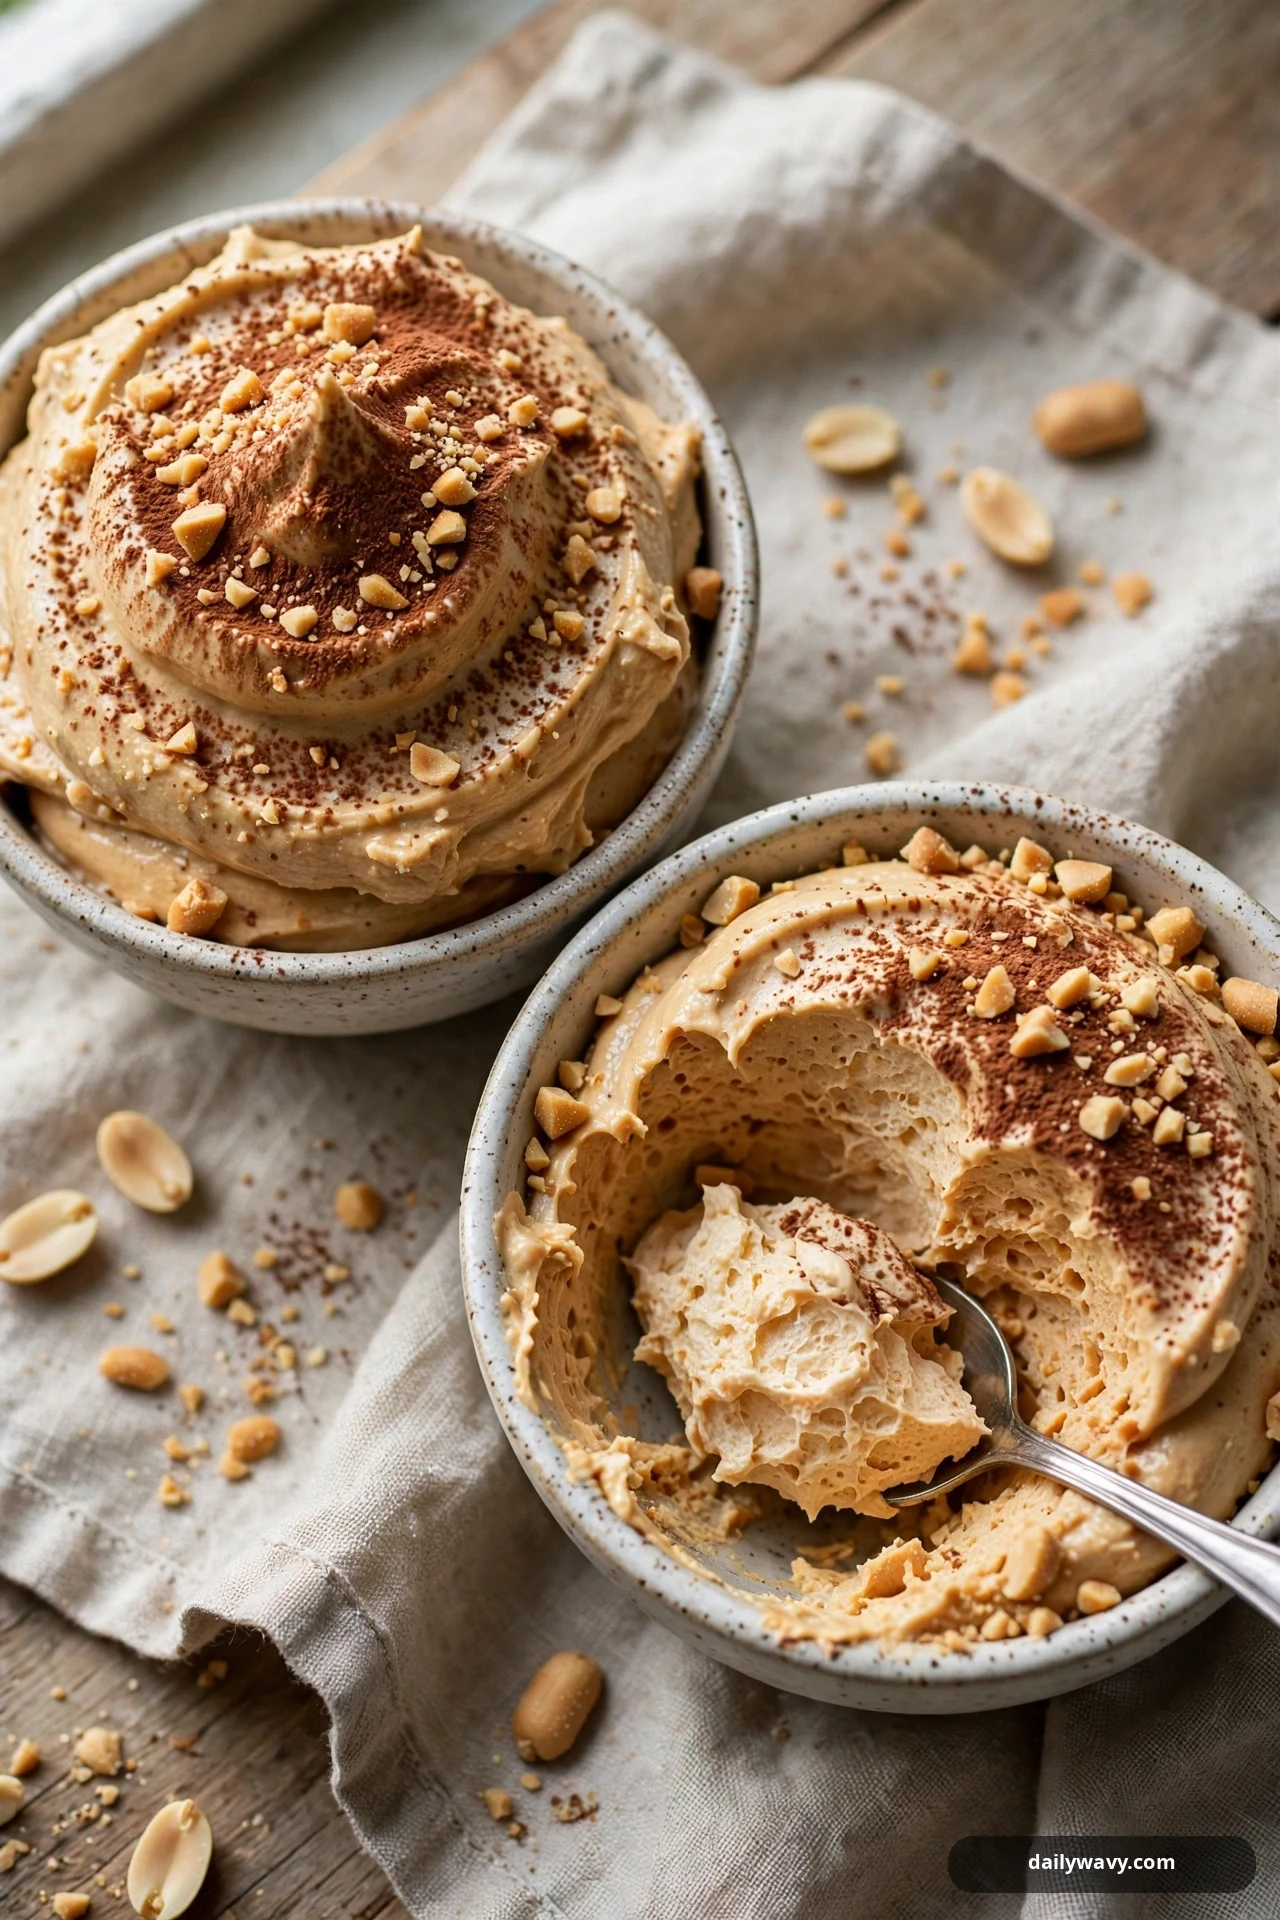
Think of this as peanut butter mousse served the casual way: big soft bowls of whipped peanut butter cream, dusted with cocoa, eaten with a spoon straight from the fridge. No crust, no layers, just the good part.
You need (makes 6 bowls):
- 1 cup creamy peanut butter
- 8 oz cream cheese (room temperature)
- 1 cup powdered sugar
- 1 teaspoon vanilla extract
- 2 cups heavy cream
- 2 tablespoons cocoa powder
- 3 tablespoons crushed peanuts
Method: Beat the peanut butter, cream cheese, powdered sugar, and vanilla until completely smooth, scraping the bowl twice. Whip the cream to medium peaks in a separate bowl and fold it in gently in three additions, keeping as much air as possible. Divide among six bowls, cover, and chill 2 hours. Dust with cocoa and scatter peanuts over the top just before serving.
Timing: 2 hours to chill and firm; the mousse is spoonable but holds its shape.
Troubleshooting: If the mousse is dense, the cream was folded in too aggressively. Fold with a spatula, cutting down through the middle and turning the bowl, until just combined. If it tastes flat, add a pinch of salt; peanut butter desserts often need it.
Storage: Cover and refrigerate up to 3 days. Add the cocoa and peanuts fresh each time you serve. It also freezes acceptably for up to a month, though the texture is best fresh.
Why it works: Without a crust or cookie to compete, the peanut butter flavor is front and center, and the whipped texture keeps it from feeling heavy. It is a simple way to serve a crowd.
6. Peanut Butter Chilled Coconut Bites

These are the energy-ball style bite done dessert-proper: peanut butter, honey, and oats rolled in coconut, chilled until firm. They live in the fridge and keep well.
You need (makes about 24 bites):
- 1 cup creamy peanut butter
- 1/2 cup honey
- 2 cups old-fashioned rolled oats
- 1 cup unsweetened shredded coconut (plus 1/2 cup extra for rolling)
- 1 teaspoon vanilla extract
- 1/4 teaspoon fine sea salt
Method: Stir the peanut butter and honey until smooth; warm the peanut butter 10 seconds in the microwave if it is stiff. Add the oats, 1 cup coconut, vanilla, and salt, and mix until every oat is coated. Chill the mixture 20 minutes so it is easier to handle, then roll into 1-inch balls and roll each in the extra coconut. Chill 1 hour until firm.
Timing: 20 minutes rest plus 1 hour chill. No oven, no stove, just waiting.
Troubleshooting: If the mixture will not hold together, add peanut butter a tablespoon at a time, up to 3 extra tablespoons. If the balls are sticky, wet your hands lightly before rolling; it makes the job much easier.
Storage: Refrigerate in an airtight container up to 2 weeks. They firm up more over time, so let them sit 5 minutes at room temperature before eating if you prefer them softer.
Why it works: The oats give chew, the coconut gives a snowy coating and a tropical note, and honey binds everything together. They read as a treat but eat like a snack.
7. Peanut Butter Biscuit Sandwiches

Two crisp biscuits, a thick peanut butter filling, and chocolate-dipped edges. These are the homemade answer to the peanut butter sandwich cookie, and they keep beautifully in a tin.
You need (makes 8 sandwiches):
- 16 plain digestive biscuits or shortbread cookies
- 1/2 cup creamy peanut butter
- 1/4 cup powdered sugar
- 2 tablespoons unsalted butter (room temperature)
- 4 oz dark or milk chocolate (chopped)
- 1 teaspoon coconut oil
Method: Beat the peanut butter, powdered sugar, and butter until smooth and spreadable. Sandwich the biscuits in pairs with about 1 1/2 tablespoons of filling each. Melt the chocolate with the coconut oil in short microwave bursts, stirring until smooth. Dip one edge of each sandwich in chocolate and set on parchment. Chill 30 minutes until set.
Timing: 30 minutes to set the chocolate; the filling firms as it chills.
Troubleshooting: If the filling squeezes out when you press the biscuits together, chill it 10 minutes first so it is stiffer. If the chocolate coating cracks, the chocolate was too thick; stir in a little more coconut oil and dip again.
Storage: Refrigerate in an airtight container up to 1 week, layered with parchment. They are fine at cool room temperature for a day.
Why it works: Crisp biscuit against creamy filling is a classic pairing, and the chocolate edge adds a candy-shop finish. These are easy for kids to pick up and eat.
8. Peanut Butter Pretzel Dessert Cups

Salty, sweet, creamy, crunchy. A buttery pretzel base, a tangy peanut butter layer, and whipped cream on top, all built in individual cups so everyone gets the perfect ratio.
You need (makes 6 cups):
- 2 cups mini pretzels (crushed)
- 4 tablespoons unsalted butter (melted)
- 8 oz cream cheese (room temperature)
- 1/2 cup creamy peanut butter
- 1/2 cup powdered sugar
- 1 cup heavy cream (plus 1/2 cup more for topping)
- 2 tablespoons powdered sugar (for topping)
- chocolate drizzle and pretzel pieces to garnish
Method: Mix the crushed pretzels with the melted butter and press 5 tablespoons into each of six cups. Chill 20 minutes. Beat the cream cheese, peanut butter, and 1/2 cup powdered sugar until smooth. Whip 1 cup cream to medium peaks and fold in. Spoon over the pretzel bases. Whip the remaining 1/2 cup cream with 2 tablespoons powdered sugar and add a cloud to each cup. Chill 3 hours. Drizzle with chocolate and scatter pretzel pieces over the top just before serving.
Timing: 3 hours minimum so the pretzel base sets and the layers firm up.
Troubleshooting: If the pretzel base falls apart, it needed more butter or a harder press; pack it down firmly with a spoon. If the peanut butter layer is lumpy, the cream cheese was not fully soft.
Storage: Cover and refrigerate up to 3 days. If making ahead, add the whipped cream topping the day you serve for the freshest look.
Why it works: The salt in the pretzels makes the peanut butter taste more like itself, and the single-serve format keeps the crunchy base from going soggy the way a sliced bar can.
9. Peanut Butter Frozen Yogurt Bites

These live in the freezer and eat like little ice cream bonbons. Swirled peanut butter yogurt, frozen solid, studded with chocolate chips. Four ingredients, one tray, endless snacking.
You need (makes about 18 bites):
- 2 cups plain Greek yogurt (full-fat works best)
- 1/3 cup creamy peanut butter
- 1/4 cup honey
- 1/4 cup mini chocolate chips
Method: Stir the yogurt, peanut butter, and honey until completely smooth. Line a baking sheet with parchment. Drop 2-tablespoon-sized dollops onto the sheet, spacing them apart. Press a few mini chocolate chips into each. Freeze 2 hours until solid, then transfer to a freezer bag.
Timing: 2 hours to freeze solid. Serve straight from the freezer.
Troubleshooting: If the bites are icy rather than creamy, the yogurt was low-fat; full-fat Greek yogurt freezes with a much better texture. If they melt too fast in your hand, keep the bag in the freezer and take out only a few at a time.
Storage: Freeze in an airtight bag up to 2 months. Keep them frozen; they soften quickly at room temperature.
Why it works: Freezing turns tangy yogurt into something that eats like cheesecake filling, and the peanut butter keeps it from freezing rock-hard. It is one of the lightest desserts on this list.
10. Peanut Butter Dessert Dip

A dessert dip is a party trick: one bowl and a ring of dippers. This one tastes like the inside of a peanut butter cup, whipped light.
You need (makes about 2 1/2 cups):
- 8 oz cream cheese (room temperature)
- 1/2 cup creamy peanut butter
- 1 cup powdered sugar
- 1 teaspoon vanilla extract
- 1 cup heavy cream (whipped to soft peaks)
- apple slices
- pretzel sticks
- graham cracker sticks for serving
Method: Whip the cream to soft peaks. Beat the cream cheese, peanut butter, powdered sugar, and vanilla until smooth. Fold in the whipped cream in two additions until light and fluffy. Spoon into a serving bowl, swirl the top with the back of a spoon, and chill 1 hour. Serve with the dippers arranged around it.
Timing: 1 hour to chill and firm slightly. It is best served cool but not ice-cold.
Troubleshooting: If the dip is too thick to scoop, fold in a splash of milk. If it is too thin, it was overmixed after the cream went in; whip the cream a little firmer next time.
Storage: Refrigerate up to 3 days. Remember the 2-hour rule: do not leave the dip sitting out at a party longer than 2 hours (1 hour if it is above 90°F).
Why it works: The interactive format is the appeal. People dip what they like, the sweet-salty mix of pretzels and peanut butter does the rest, and there is nothing to slice or portion.
11. Peanut Butter Chia Pudding

Chia pudding is the patient person's dessert: stir it at night, wake up to something silky. Peanut butter and a little maple syrup turn the mild chia base into a proper treat.
You need (makes 2 jars):
- 1/4 cup chia seeds
- 1 cup milk (dairy or oat)
- 2 tablespoons creamy peanut butter
- 1 tablespoon maple syrup
- 1/2 teaspoon vanilla extract
- banana slices and crushed peanuts to top
Method: Whisk everything except the toppings in a bowl until the peanut butter is fully blended in. Divide between two jars or glasses. Rest 10 minutes, then whisk again to break up any clumps. Cover and refrigerate overnight, at least 8 hours.
Timing: Overnight. Chia needs the full rest to turn from crunchy seeds to a smooth pudding.
Troubleshooting: If the pudding is lumpy, it was not whisked a second time; that second stir is what prevents clumps. If it is too thick in the morning, stir in a splash of milk.
Storage: Refrigerate up to 4 days. Add the banana and peanuts just before serving so they stay fresh.
Why it works: The tiny seeds swell into a tapioca-like texture that carries peanut butter flavor beautifully. It eats like dessert and works as breakfast, which is a useful double life.
12. Peanut Butter No-Bake Cereal Clusters

Melt, toss, drop, chill. These clusters are one of the crunchiest things on the list: cornflakes lacquered in peanut butter and chocolate, broken into rustic chunks.
You need (makes about 20 clusters):
- 1/2 cup unsalted butter
- 1 cup creamy peanut butter
- 1 cup semi-sweet chocolate chips
- 4 cups cornflakes cereal
- 1/2 teaspoon flaky sea salt
Method: Melt the butter, peanut butter, and chocolate chips together in a large saucepan over low heat (or in the microwave in 30-second bursts), stirring until completely smooth. Remove from the heat and fold in the cornflakes gently until every flake is coated. Drop heaping tablespoons onto a parchment-lined sheet. Sprinkle with flaky salt and chill 45 minutes until firm.
Timing: 45 minutes to set. They firm up faster in the freezer, about 20 minutes.
Troubleshooting: If the clusters fall apart, the coating was too thin; press each cluster together firmly as you drop it. If the chocolate seizes, the heat was too high; keep it low and stir constantly.
Storage: Store in an airtight container at cool room temperature up to 5 days, or refrigerate up to 2 weeks for extra crunch.
Why it works: The cornflakes stay shatteringly crisp under the peanut butter chocolate shell, and the flaky salt on top makes each bite taste balanced instead of just sweet.
13. Peanut Butter Whipped Ricotta Cups

Whipped ricotta is a revelation: beaten for a few minutes, it turns from grainy to cloud-like. Folded with peanut butter and honey, it becomes a light, elegant dessert that tastes far fancier than the effort suggests.
You need (makes 4 cups):
- 1 1/2 cups whole-milk ricotta
- 1/3 cup creamy peanut butter
- 1/4 cup honey
- 1 teaspoon vanilla extract
- pinch of fine sea salt
- cocoa powder and crushed roasted peanuts to finish
Method: Beat the ricotta alone for 3 full minutes until completely smooth and fluffy. Add the peanut butter, honey, vanilla, and salt, and beat 1 more minute. Spoon into four cups and chill 1 hour. Dust with cocoa and scatter peanuts over the top before serving.
Timing: 1 hour to chill and let the flavors meld.
Troubleshooting: If the ricotta stays grainy, it was low-fat; whole-milk ricotta whips up dramatically better. Drain watery ricotta in a fine sieve for 30 minutes first if it looks loose.
Storage: Cover and refrigerate up to 3 days. The texture is best on day one.
Why it works: Ricotta brings a gentle milky flavor and an airy texture that lets the peanut butter shine without heaviness. It is one of the most delicate desserts on this list.
14. Peanut Butter Layered Fruit Fool

A fool is an old English dessert of fruit folded into cream. This version layers peanut butter whipped cream with jammy macerated strawberries, and the sweet-tart fruit cuts the richness perfectly.
You need (makes 6 glasses):
- 2 cups strawberries (hulled and sliced)
- 2 tablespoons sugar
- 1/2 cup creamy peanut butter
- 1/2 cup powdered sugar
- 2 cups heavy cream
- 1 teaspoon vanilla extract
Method: Toss the strawberries with the sugar and let them sit 20 minutes until juicy. Beat the peanut butter, powdered sugar, vanilla, and 1/2 cup of the cream until smooth. Whip the remaining 1 1/2 cups cream to medium peaks and fold into the peanut butter mixture. Layer the cream and strawberries in six glasses, starting and ending with cream. Chill 2 hours.
Timing: 20 minutes to macerate plus 2 hours to chill.
Troubleshooting: If the layers bleed together, the berries were too juicy; spoon them in with a slotted spoon and drizzle the juice over the top instead. If the cream deflates, the peanut butter base was too warm when folded in.
Storage: Refrigerate up to 2 days. The berries soften over time, so this one is best fresh.
Why it works: Peanut butter and strawberry is a classic pairing for a reason, and the fool format keeps every spoonful balanced. It is also a pretty dessert to serve guests.
15. Peanut Butter Mousse Cups

Two layers, one cup: dark chocolate ganache on the bottom, silky peanut butter mousse on top. It looks like a restaurant dessert and takes about 20 minutes of actual work.
You need (makes 6 cups):
- 1 cup semi-sweet chocolate chips
- 1/4 cup heavy cream (for ganache)
- 1/2 cup creamy peanut butter
- 1 cup heavy cream (for mousse)
- 1/4 cup powdered sugar
- whipped cream and a peanut to garnish
Method: Melt the chocolate chips with the 1/4 cup cream in short microwave bursts, stirring until glossy. Divide among six cups and chill 20 minutes to set. Beat the peanut butter, 1 cup cream, and powdered sugar until thick and mousse-like, about 2 minutes. Pipe or spoon over the set ganache. Chill 3 hours until firm. Top with a swirl of whipped cream and a peanut before serving.
Timing: 20 minutes for the ganache to set, then 3 hours for the mousse to firm.
Troubleshooting: If the mousse slides off the ganache, the ganache was not set yet; give it the full 20 minutes. If the mousse is runny, it was under-beaten; beat until thick and mousse-like before piping.
Storage: Cover and refrigerate up to 3 days. Add the whipped cream garnish fresh. It also freezes acceptably for up to a month, though the texture is best fresh.
Why it works: The bitter ganache base anchors the sweet mousse, and the two-tone look in a clear cup does all the presenting for you. It is a dinner-party-ready idea.
16. Peanut Butter Biscuit-Layer Jars
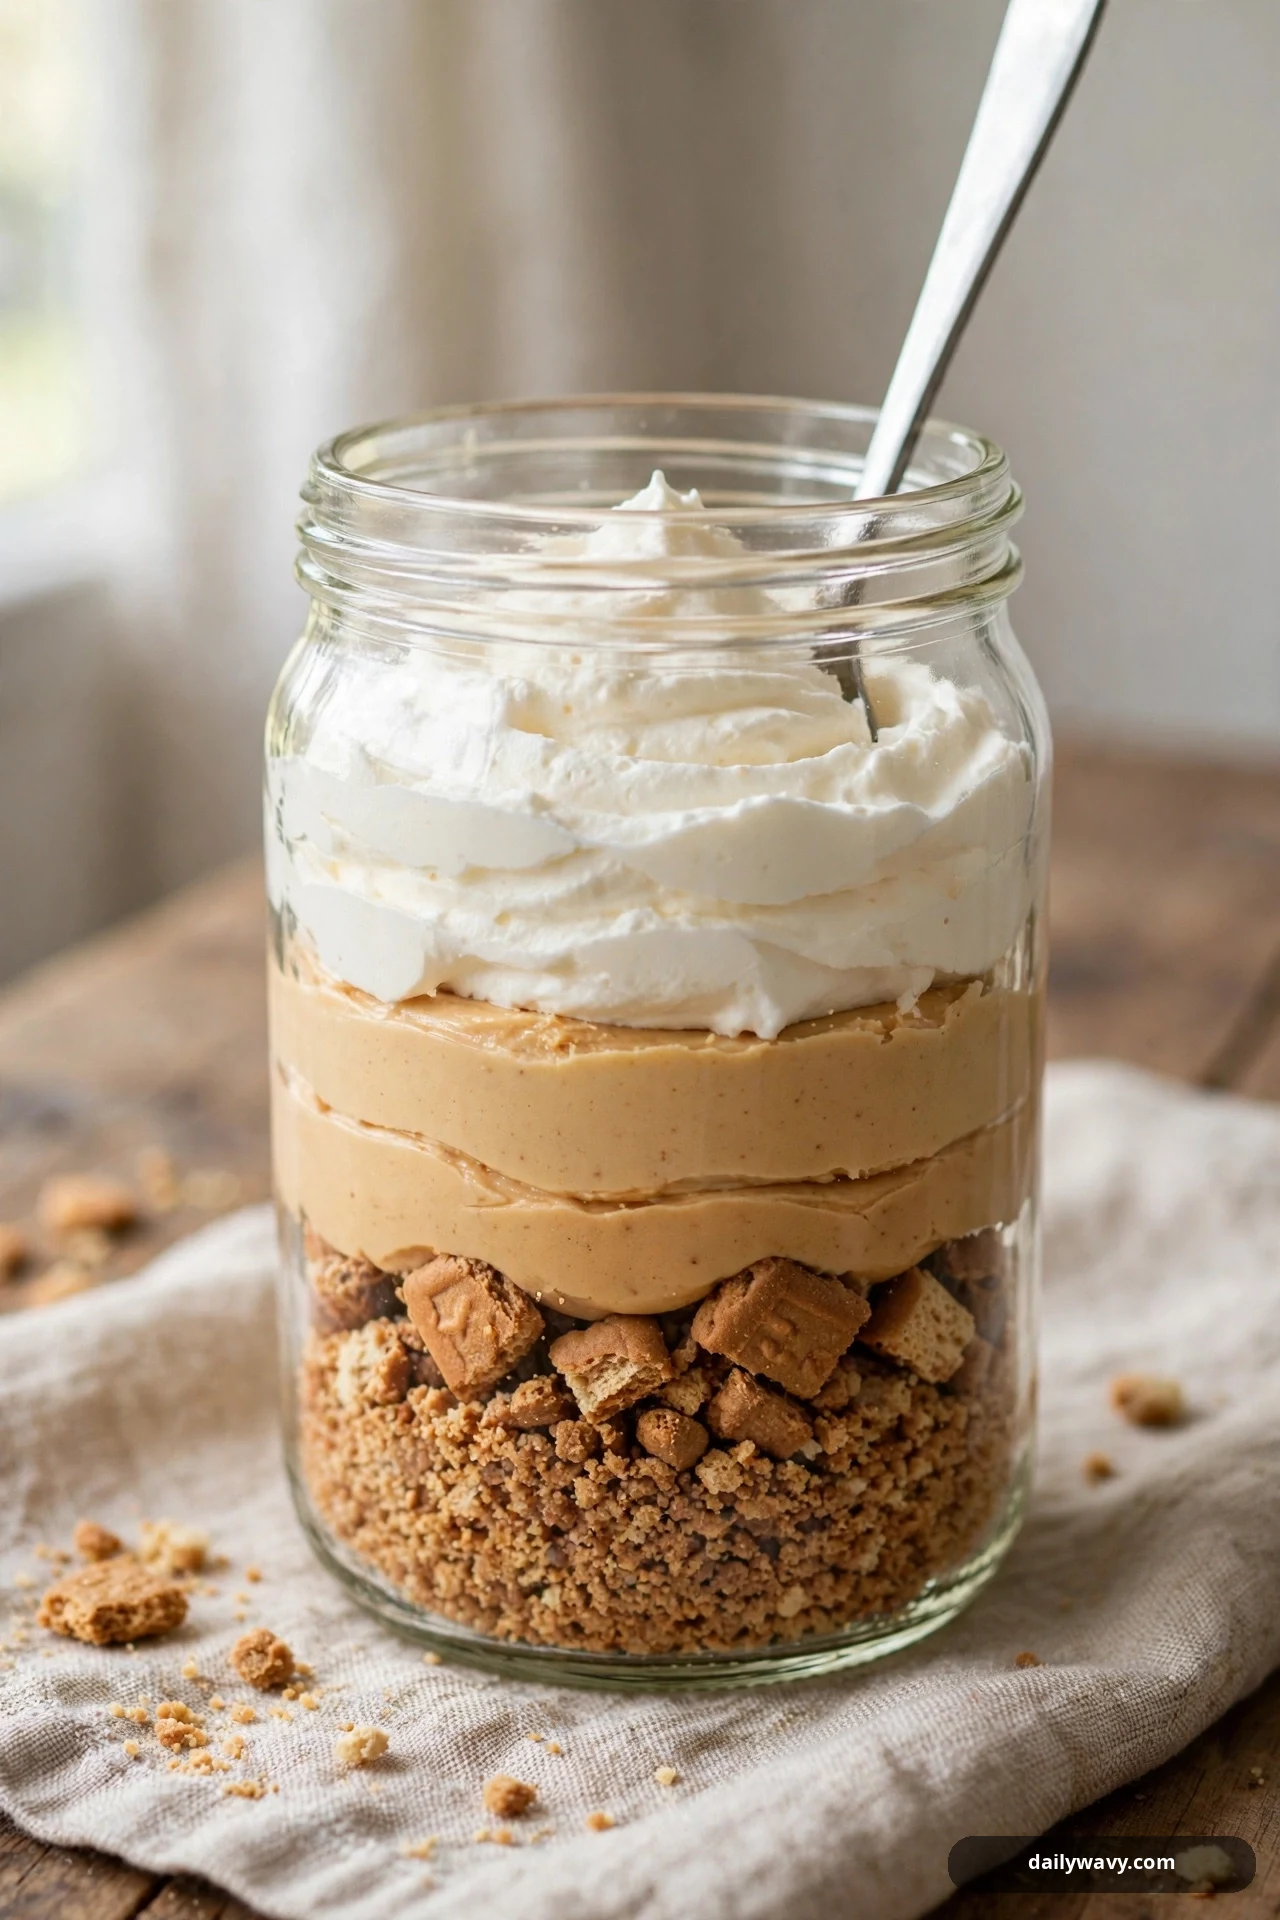
Jars make everything feel intentional. Crushed biscuits and peanut butter mascarpone cream in visible stripes, finished with a long spoon. Portable, giftable, and completely make-ahead.
You need (makes 4 jars):
- 1 cup crushed digestive biscuits
- 3 tablespoons unsalted butter (melted)
- 1/2 cup creamy peanut butter
- 8 oz mascarpone (room temperature)
- 1/3 cup powdered sugar
- 1 cup heavy cream (whipped to soft peaks)
- crushed peanuts to finish
Method: Mix the biscuit crumbs with the melted butter. Whip the cream to soft peaks. Beat the peanut butter, mascarpone, and powdered sugar until smooth, then fold in the whipped cream. Layer crumbs and peanut butter cream in four jars, repeating to fill. Cap or cover and chill at least 4 hours or overnight. Sprinkle with crushed peanuts before serving.
Timing: 4 hours minimum; overnight gives the crumb layer time to soften slightly and meld.
Troubleshooting: If the mascarpone mixture curdles, the mascarpone was too cold or overbeaten; bring it to room temperature and beat only until smooth. If the layers look messy, use a piping bag or zip-top bag with the corner snipped for neat stripes.
Storage: Refrigerate up to 3 days with lids on. They travel well, which makes them ideal for picnics and potlucks.
Why it works: Mascarpone gives the cream a subtle tang and a luxurious mouthfeel that plain whipped cream cannot match. The jar format keeps every layer distinct until the spoon goes in.
No-Bake Peanut Butter Questions, Answered
Can I make these desserts ahead of a party?
Yes, that is their superpower. Many ideas on this list need 2 to 4 hours of chilling anyway, and the icebox cake is better on day two. The tart, icebox cake, and biscuit-layer jars all improve overnight. The pudding cups, fruit fool, and ricotta cups are best freshest, within a day or two of making.
Can I use natural peanut butter?
For most of these, yes, but stir it very well first; the oil separation can make fillings greasy. For recipes where the peanut butter must set firmly, like the cereal clusters and the coconut bites, regular creamy peanut butter gives a more reliable result because its texture is consistent.
How do I keep a no-bake crust from crumbling?
Two things: enough butter to bind every crumb, and firm, even pressure when you press it in. Use the flat bottom of a measuring cup, not your fingers, and chill the crust before adding any filling. A crumbly crust is almost always an under-pressed crust.
Are these safe to pack for school or share at work?
Check for nut allergies first; many schools and offices are nut-free, and peanut butter desserts do not belong there. Where nuts are fine, the coconut bites, cereal clusters, biscuit sandwiches, and filled dates travel best.
How long do no-bake desserts keep?
Most creamy dairy desserts keep 3 to 4 days refrigerated at 40°F or below. Lower-moisture ones keep longer: biscuit sandwiches up to 1 week, coconut bites up to 2 weeks, and cereal clusters up to 2 weeks refrigerated. Frozen yogurt bites keep up to 2 months in the freezer. Anything with fresh fruit, like the fool, is best within 2 days. When in doubt, the 2-hour rule applies: refrigerate within 2 hours of making or serving (1 hour if it is above 90°F).
Can I freeze the creamy ones?
The frozen yogurt bites are designed for it. The mousse cups and whipped dessert bowls freeze acceptably for up to a month, though the texture is best fresh. Do not freeze the tart or the pudding cups; dairy fillings can turn grainy when thawed. The remaining chilled desserts are best kept refrigerated and eaten within the storage times in each section.
Pick Your Chill, Then Skip the Oven
Sixteen desserts, zero preheating. Whether you want a showpiece tart for Saturday night, a jar to carry to a picnic, or a tray of freezer bites for the week, there is a peanut butter idea here that fits the occasion. Start with the refrigerator tart if you want the full effect, or the cereal clusters if you want dessert in under an hour. For more make-ahead treats, our blueberry muffin recipes bake a batch at once and freeze well for later, and you can browse every sweet idea in Food & Drink.